Using the Student Portal
Students registered with SAS can activate their accommodations, book exams and access volunteer notes in one location. We collected all the Student Portal instructions in one place.
Student Portal Log-in Volunteer Notetaker Log-in Contact SAS
Navigating the portal
The SAS portal is designed so users may take charge in the accommodations process either as students, instructors or notetakers. In this section you will find troubleshooting tips and basic SAS Portal menu navigation.
Troubleshooting
Troubleshooting log-in
- Clear the browsing history and cookies cache on your current browser.
- Try using a private browser session.
- Try a different browser.
- Make sure you are using the UM email address connected to your UM user id.
- Please let SAS know if you recently had a UMNetID username change. This may be the root of some log-in troubles.
Troubleshooting tips for users with dual roles
A dual role is when you are a SAS registered student and a notetaker or a SAS-registered student and also have instructor access to a course. There are many dual role combinations that might cause problems with the portal.
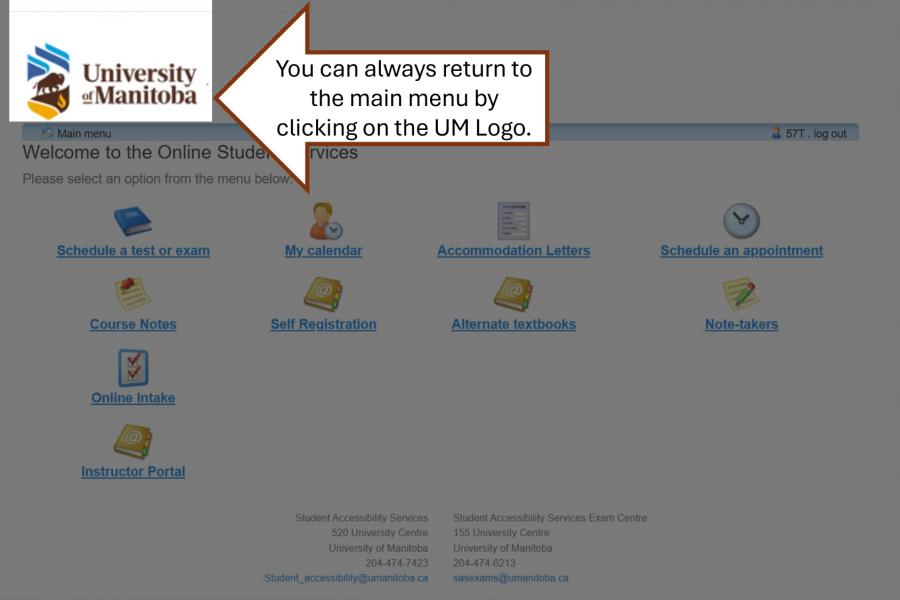
If you are already in the portal but not seeing what you expect, please click the UM Logo in the upper left corner to return to the main menu.
Menu navigation
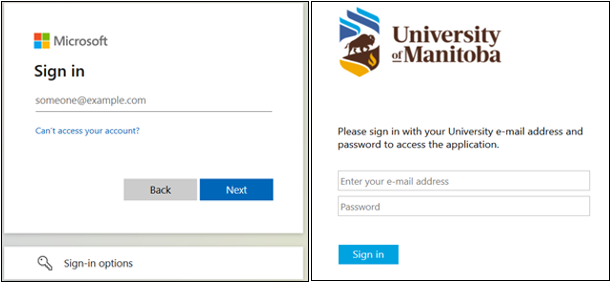
All users log into the SAS portal with their UMNetID and multifactor authentication.
The type of user determines what can be accessed on the SAS portal.
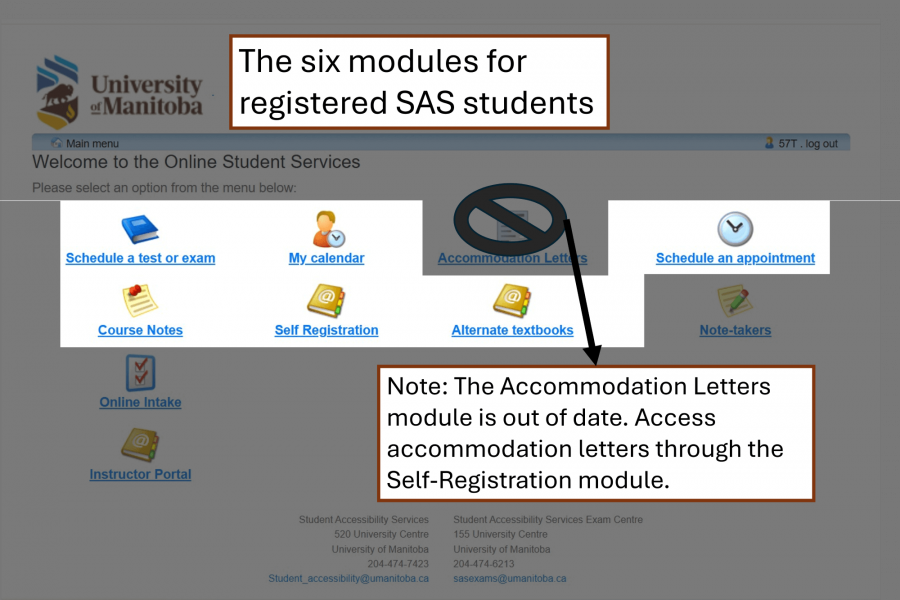
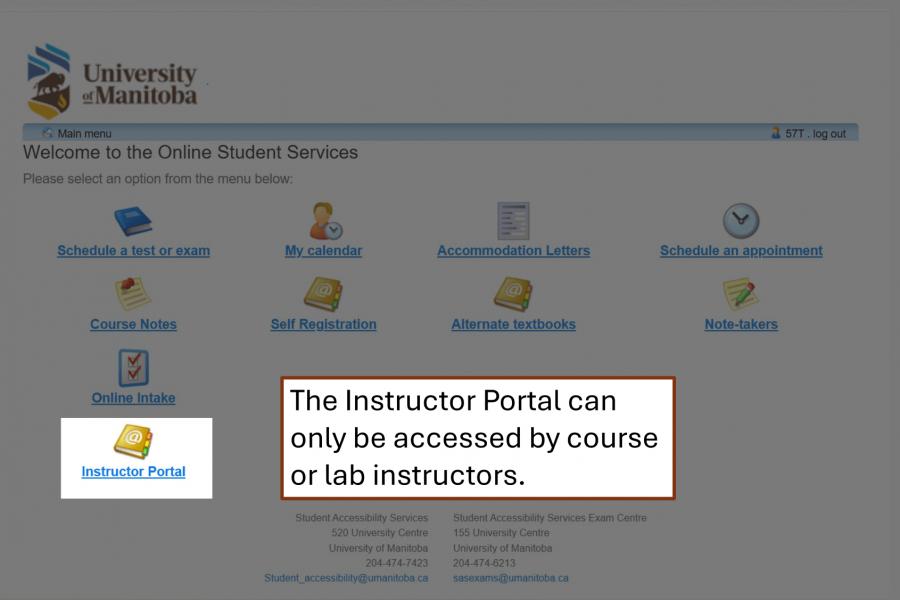
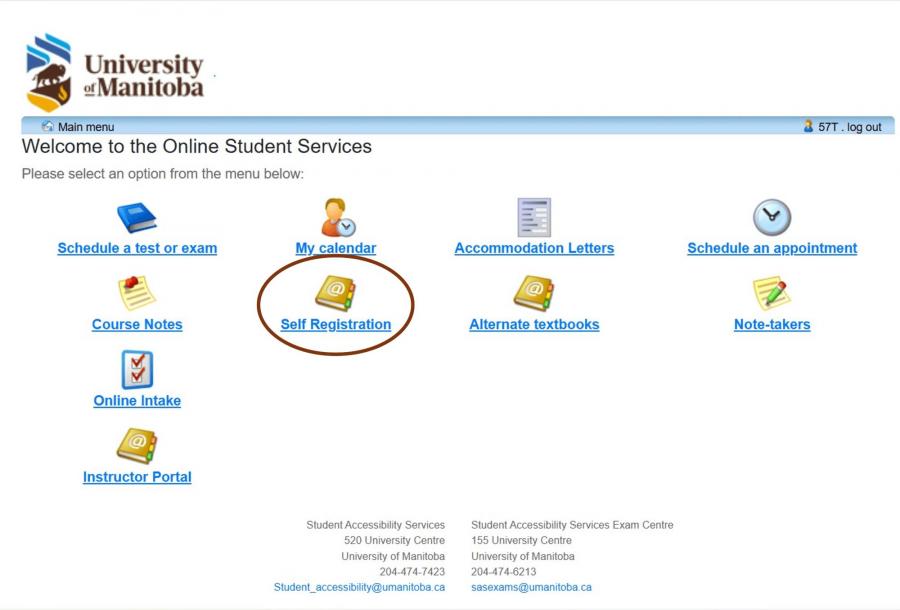
Registered students will regularly use six of the modules in the top two rows of the Main Menu. The Accommodation Letters module is out of date, all letters of accommodation can be accessed through the Self-Registration module.
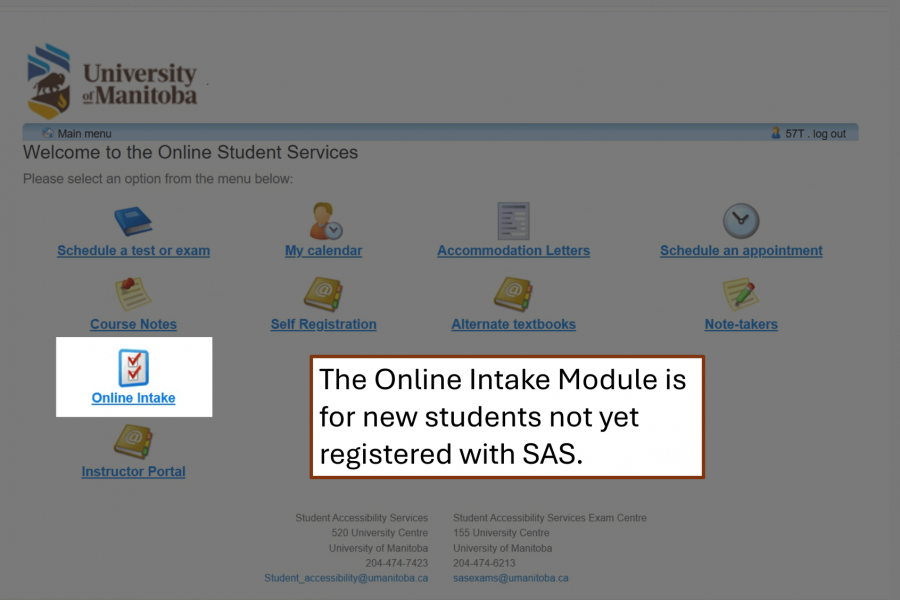
New students who are looking to register with SAS use the Online Intake module.
Volunteer Notetakers use the Note-takers module to sign up and upload course notes.

Instructors connected to lecture, lab or tutorial sections can access letters of accommodation and provide test or exam information through the Instructor Portal.
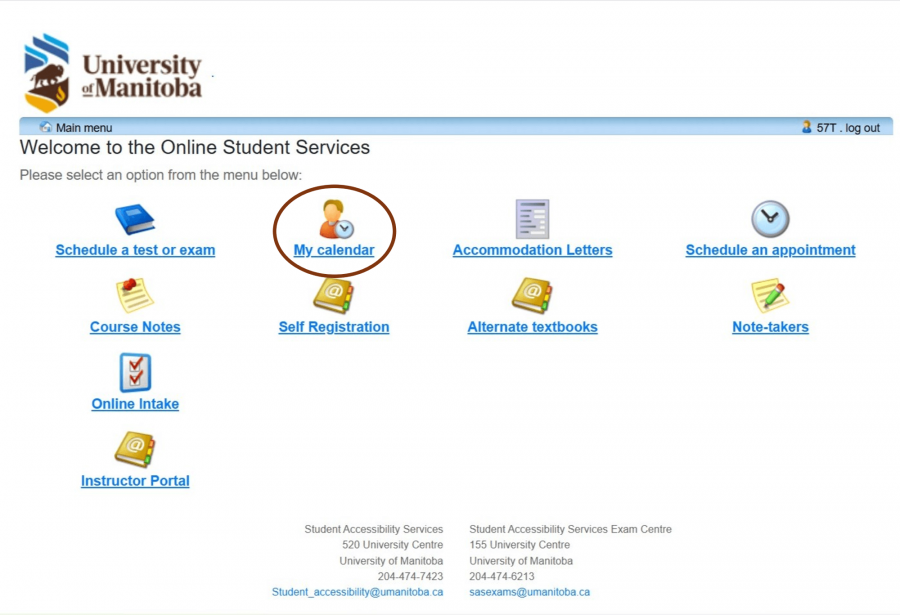
My Calendar module
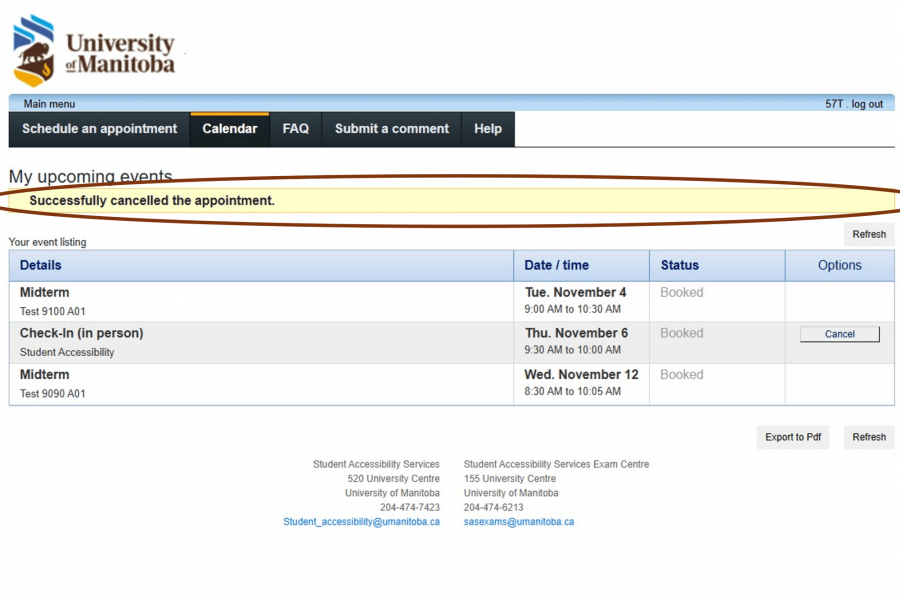
Students can view upcoming events and appointments by selecting the "My Calendar" module link on the main menu screen.
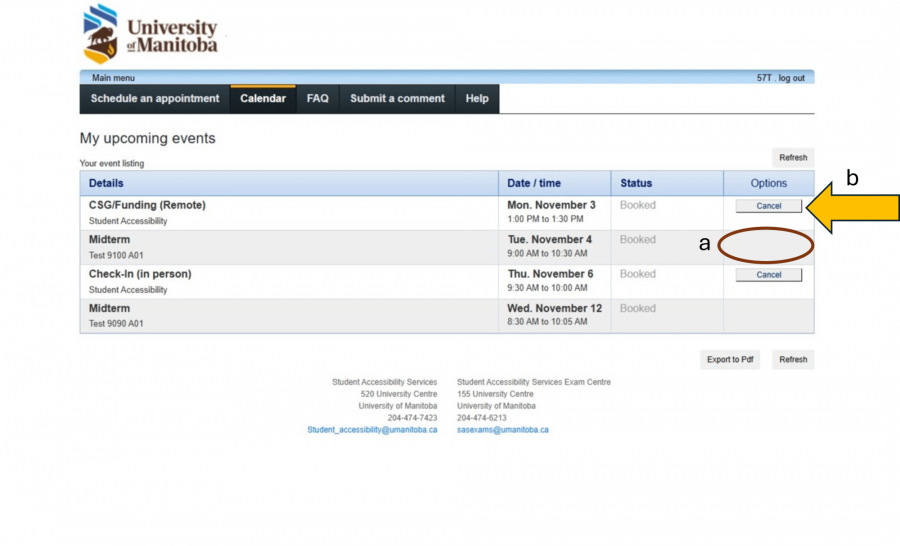
This screen has a table of upcoming events with four columns, "Details" "Date / time", "Status" and "Options".
a. Tests, quizzes, midterms and final exams cannot be cancelled through the student portal.
b. Appointments scheduled online can be cancelled through the student portal. Select "Cancel" in the "Options" column of the event listing table.
c. You will be asked to confirm your cancellation in a pop-up window. Select "OK" to confirm, or "Cancel" to return.
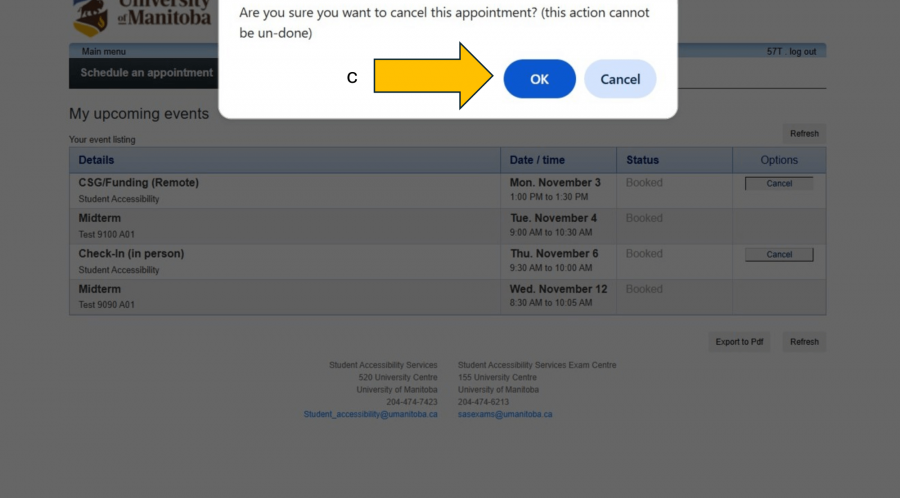
After the confirmation goes through, you will return to the events listing table with a confirmation notice listed above.
Registered Students Activating accommodations
Every term, students registered with SAS must activate their accommodations. Once activated, instructors will receive letters regarding the accommodations you have in place and test bookings will become available.
Written instructions
- Log into the Student Portal with your UM student email and two-factor authentication.
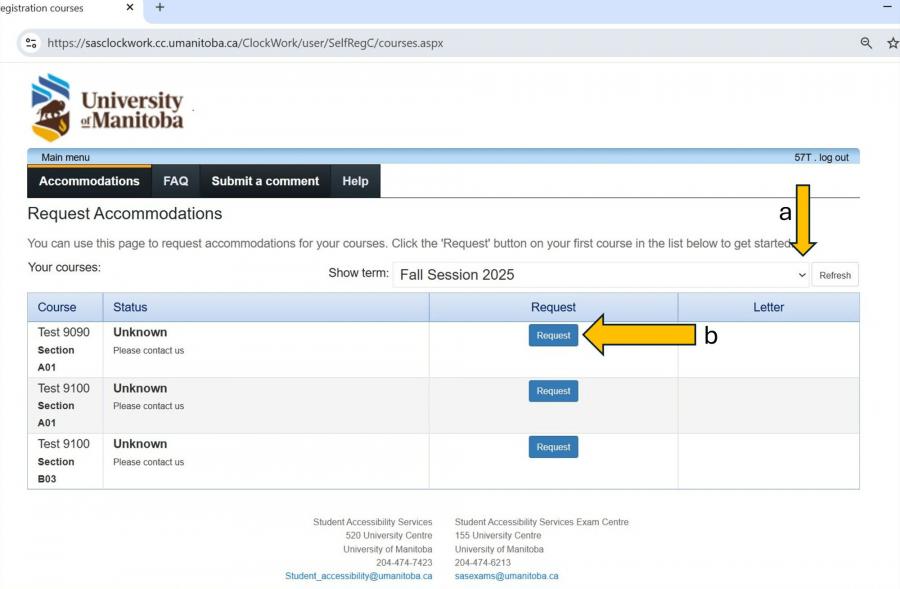
- On the main page, select "Self-registration"
- In the left hand corner, click "Accommodations"
- Click Request on your course
- Your accommodations are all checked by default, you can deselect any if not needed. Under “Courses to Request” you can also check the boxes to send for your other courses this term at the same time. Accommodations should only be requested for the current term courses, reminders are sent at the beginning of each term to activate.
- Select “My accommodation(s) are correct the way they are” and then check “I agree to the terms outlined above” and click Submit.
- The page will show confirmation your accommodations have been sent and you can view your Letter of Accommodation. You will also receive a confirmation email.
- If your request is pending due to instructor information missing, once you have received your instructor name and email, click Submit Comment, and include their contact info and course code.
Video instructions
Screenshot instructions
After you log into the SAS Portal with multi-factor authentication:
- Select the "Self-registration" link.
- Select the black "Accommodations" tab located underneath the UM Logo in the left hand corner,

You will see a list of your courses in a table with headings "Course", "Status", "Request" and "Letters".
a. You can select the term using the show term dropdown. The table should update automatically, but if it does not you can click the "Refresh" button.
b. Click the "Request" button to activate your accommodations.
a. On the Request Accommodations page, you will find a column with your accommodations pre-selected. Make sure to carefully review the accommodations and uncheck the ones that may not apply to specific courses. For example, you might not need an extensions on assignments accommodation for a course that only has tests.
b. The "Courses to request" column lists all the courses you are taking this term. You can choose to send the same list of accommodations to all instructors, or you may repeat the request process for each instructor, tailoring each accommodation list to the specific course.
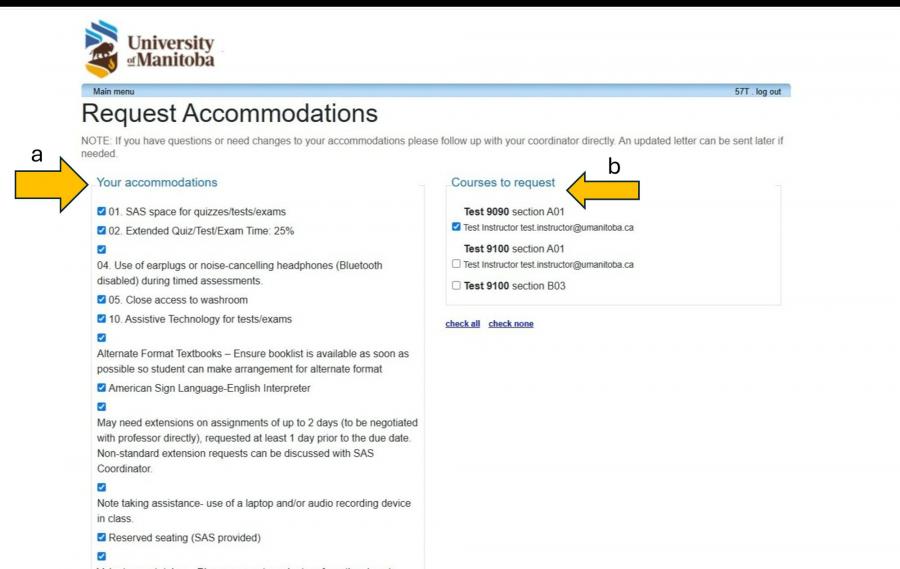
You may notice that some accommodations have numbers and others do not. This is for office organization and will not appear on the letter of accommodation that gets sent to the instructor.
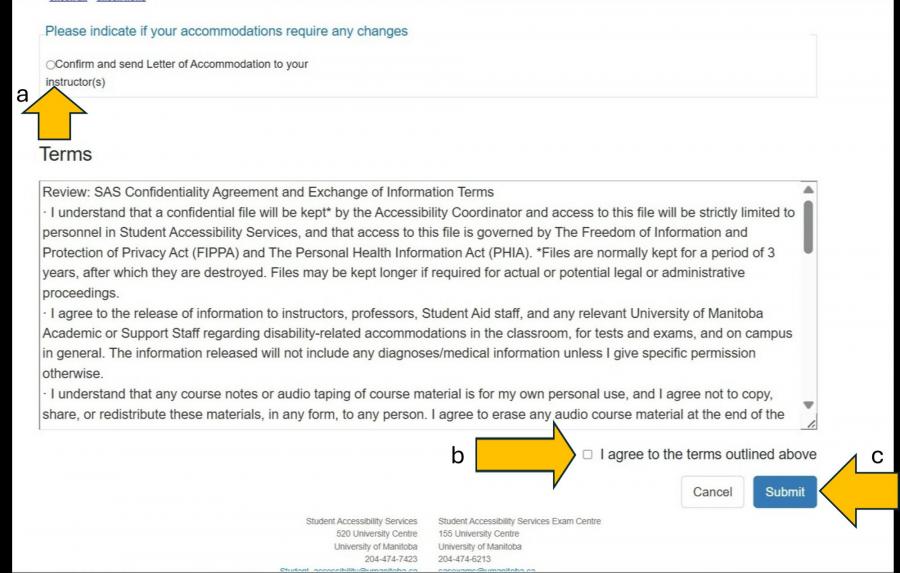
a. After reviewing your accommodation list, you must select "Confirm and send Letter of Accommodation to you Instructor(s)"
b. You must also agree to the terms. This section is a remind of the information in the SAS Confidentiality Agreement and Exchange of Information form.
c. Once you have completed the Request Accommodations form, you must select "Submit".
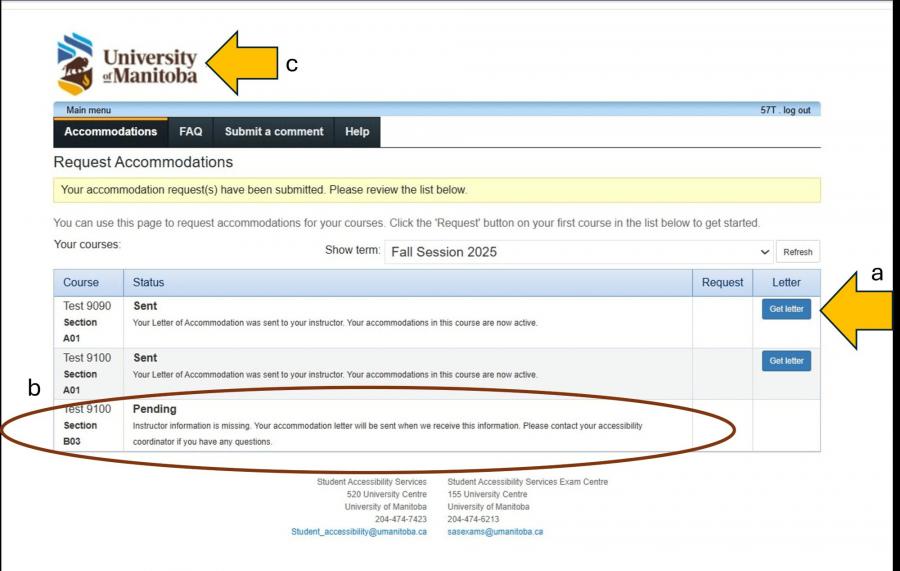
a. You will return to the Request Accommodations main page with the table of courses. Once your letter is sent, it is auto-approved and you may download a PDF copy of your letter with the "Get letter" button.
b. If your instructor information is Pending, your accommodations will not be automatically approved. Pending status means we do not have the instructor information from Aurora. If you know the instructor for a course with a Pending status, you can submit a comment with your name, the course information and the instructor's name and we will make the appropriate updates.
c. To return to the main menu, select the UM Logo.
Registered Students Booking tests and exams
For Fall/Winter term, in-person timed assessments must be booked at least 14 days in advance of the scheduled test date.
For Spring/Summer term, in-person timed assessments must be booked at least 7 days in advance of the scheduled test date.
Sunday March 15, 2026 is the deadline to book Final Exams and tests scheduled for April.
Written Instructions
- Log into the Student Portal with your UM student email and two-factor authentication.
- Select “Schedule a test or exam”
- During the term select “Schedule a test, midterm or quiz” option. If you are scheduling a final exam, select the “Schedule a final exam” option.
- This page shows what information you will need to successfully complete your booking. Click the “next” button.
- Select the course you are scheduling a test for in the drop down menu. Then click “next”.
Note: If you have not reactivated your account you will not be able to see your courses and therefore cannot schedule the test/exam. You can reactivate your accommodations through “Self-registration” or by contacting the SAS office. - Fill in the test details based on when the class writes the test/exam. It will ask for date, time and class length of test. This information is often found in your course syllabus. Click “next”.
- The instructor information will auto-fill on this page, but can be edited if its not correct. Click “next” once everything is correct.
- Select the accommodations that you require for this exam. Only accommodations that you have been approved for will show up here. Please check off what you need for the test/exam so that our Exam Centre will know which accommodations to provide.
Note: Extended time will be checked off automatically and cannot be unchecked. Click “next”. - This page verifies the details of your test/exam extended time (if applicable). Click “next” to proceed to the last page.
- This is the last page, where you will confirm the details you have entered and complete the booking. You will notice the booking has your accommodated test details at the top of the page, and the class details without accommodations below.
Note: If all of the details are correct, you must check off the acknowledgement before clicking “finish”.
Video instructions
Screenshot instructions
After you log into the SAS Portal with multi-factor authentication:
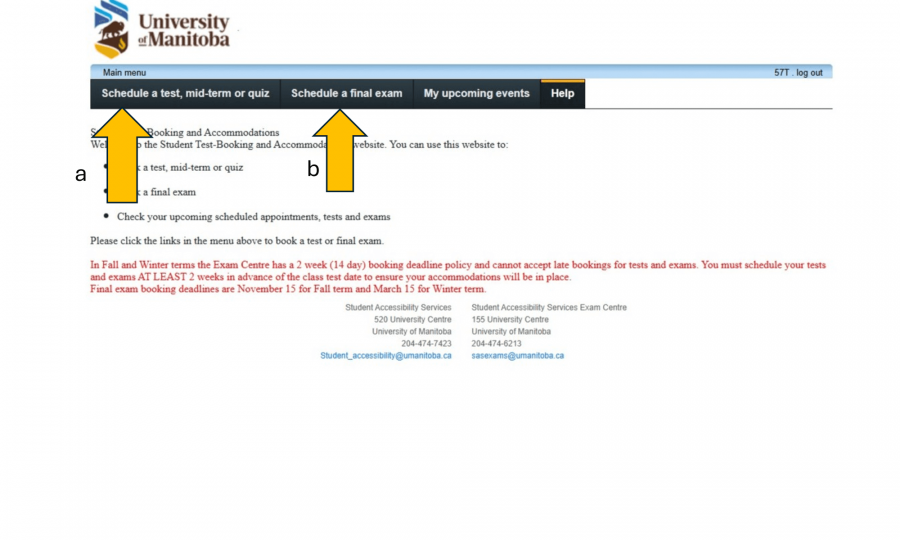
- Select the "Schedule a test or exam" module link.

To start the booking process, select either,
a. "Schedule a test, mid-term or quiz", or
b. "Schedule a final exam".
If you accidentally select the wrong one, it will not impact your booking.
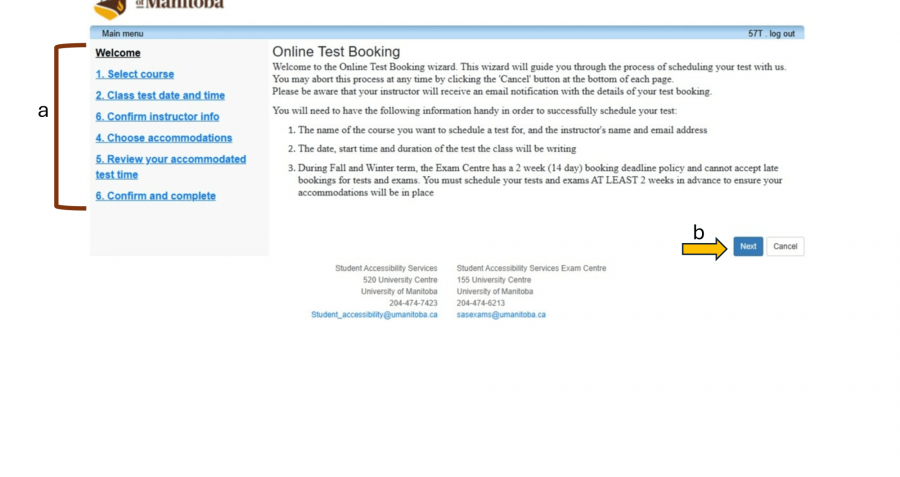
a The Welcome page indicates the steps to the process and outlines the information you need to get your test booking completed.
b. Select "Next"
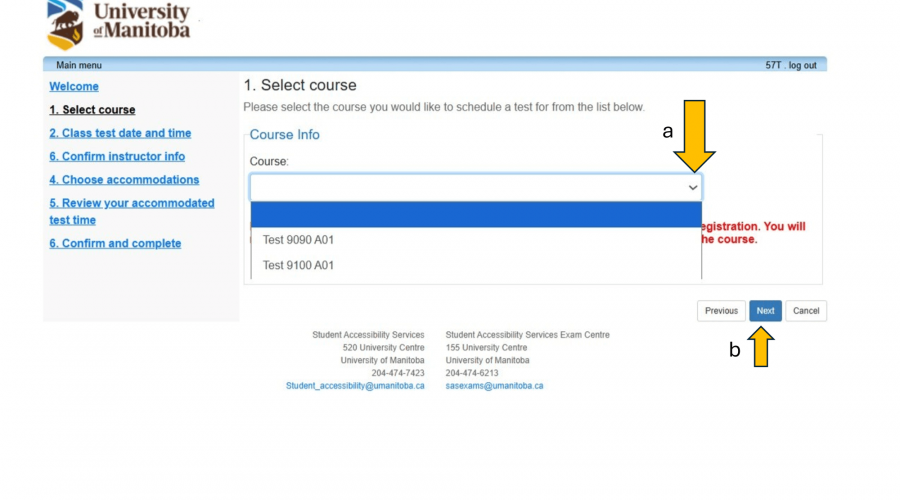
a. Select the dropdown to select the course you are scheduling a test for.
b. Select "Next"
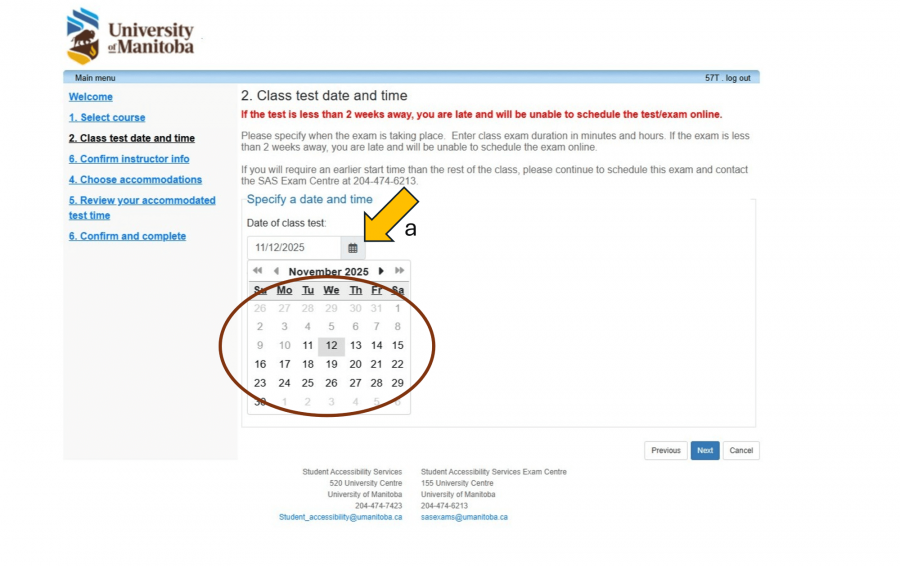
Fill in the test details based on when the class writes the test/exam.
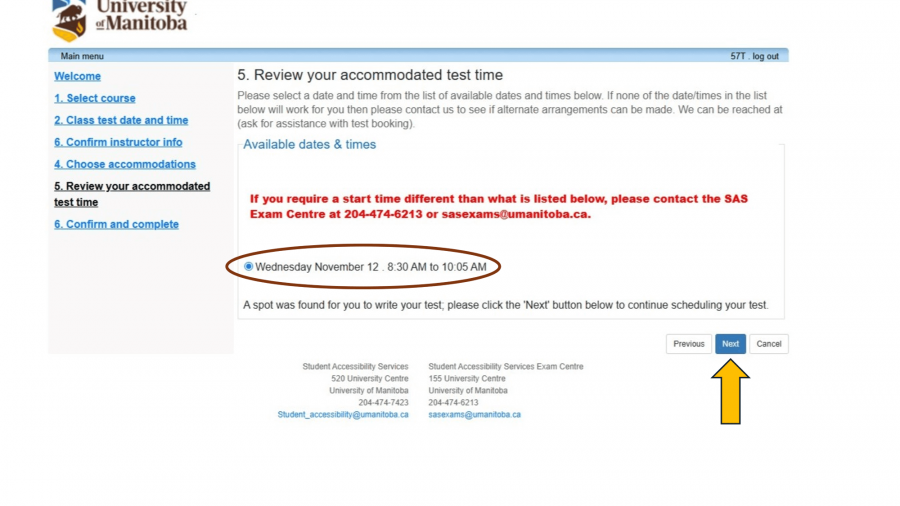
- a. Select the test date. The next open booking will be 14 days from the current date because of the 2-week test booking deadline.
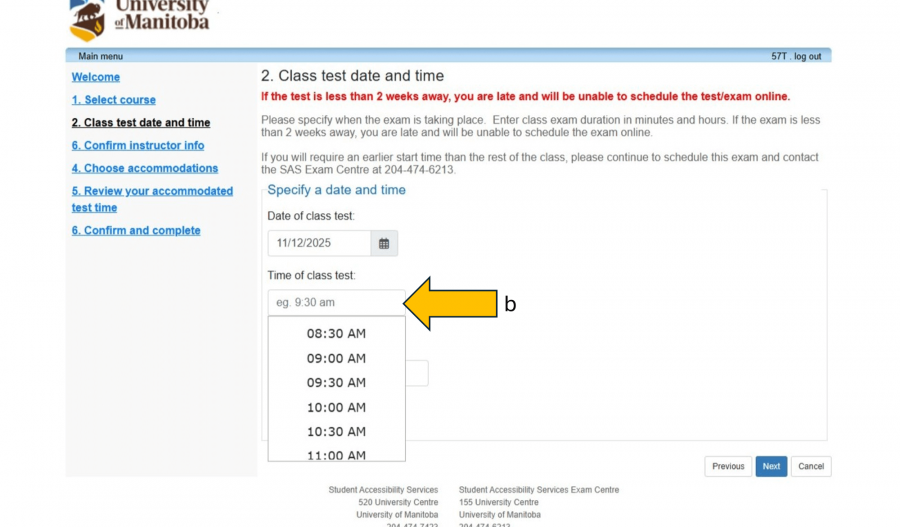
- b. Select the testing time from the dropdown menu. The Exam Centre only opens at 8:30 AM, therefore tests cannot start earlier than thet even though the list shows earlier times.
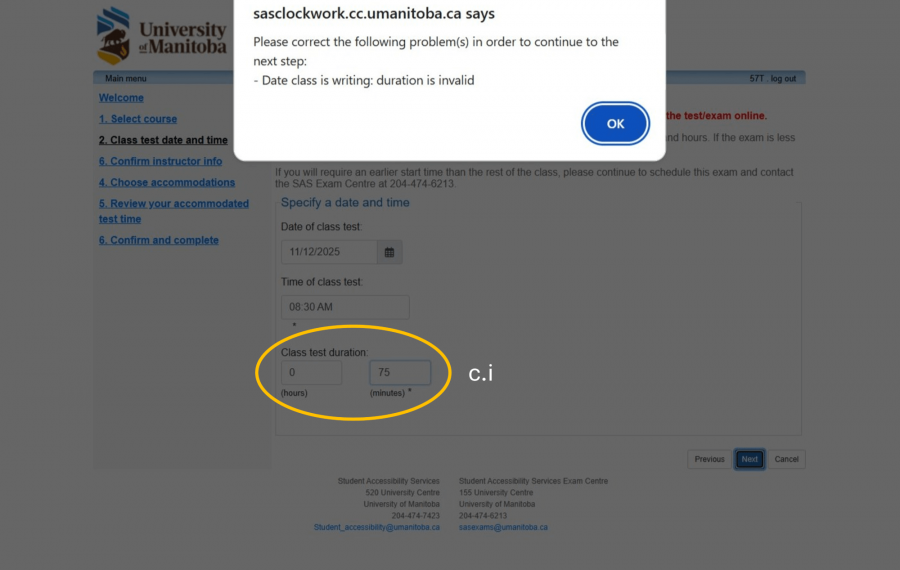
- c. Input the class test duration in hours and minutes. Do not add your extended time, SAS will calculate this for you.
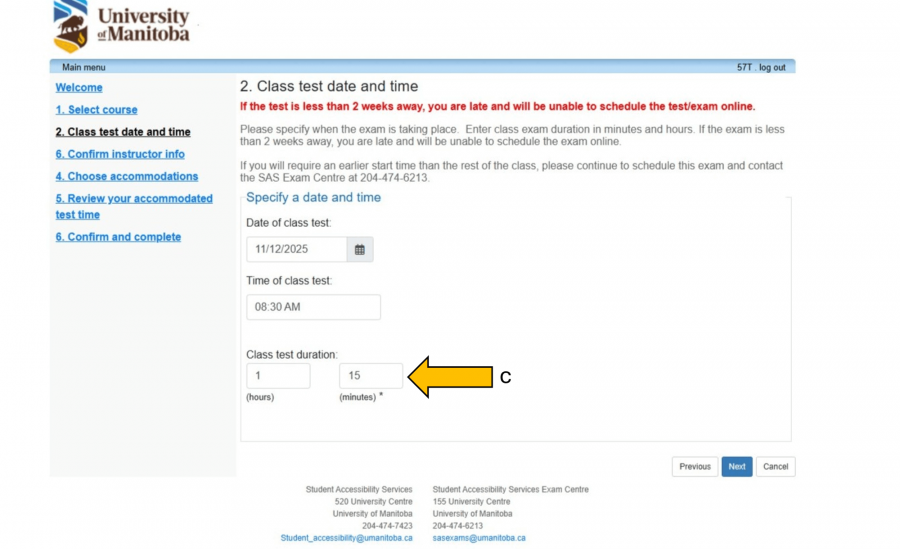
- c.i. The duration of the test must be written in hours and minutes. In this example, we tried 75 minutes and go this error. It should be written as 1 hour and 15 minutes.
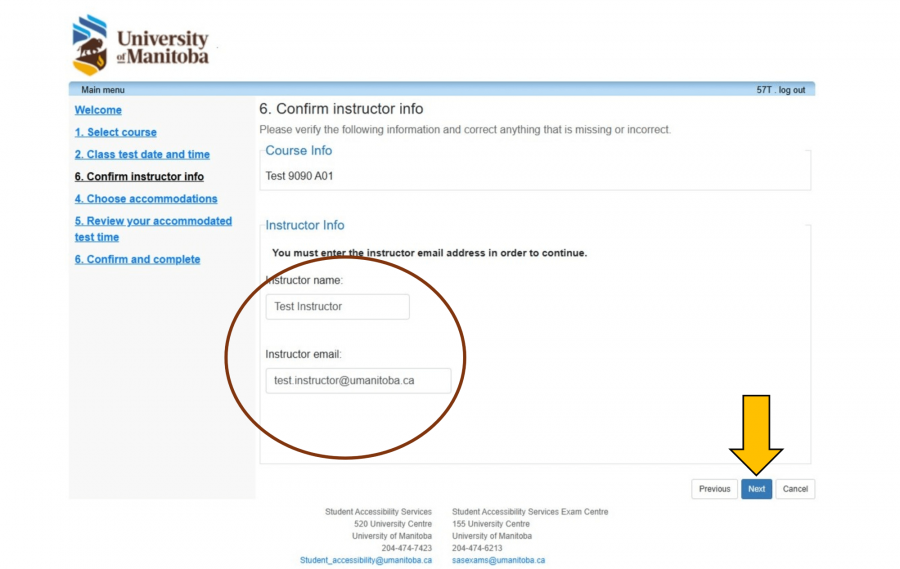
- Double check the instructor information, which should be automatically filled for you. If this information is incorrect, you can updated the information to reflect what is in your syllabus.
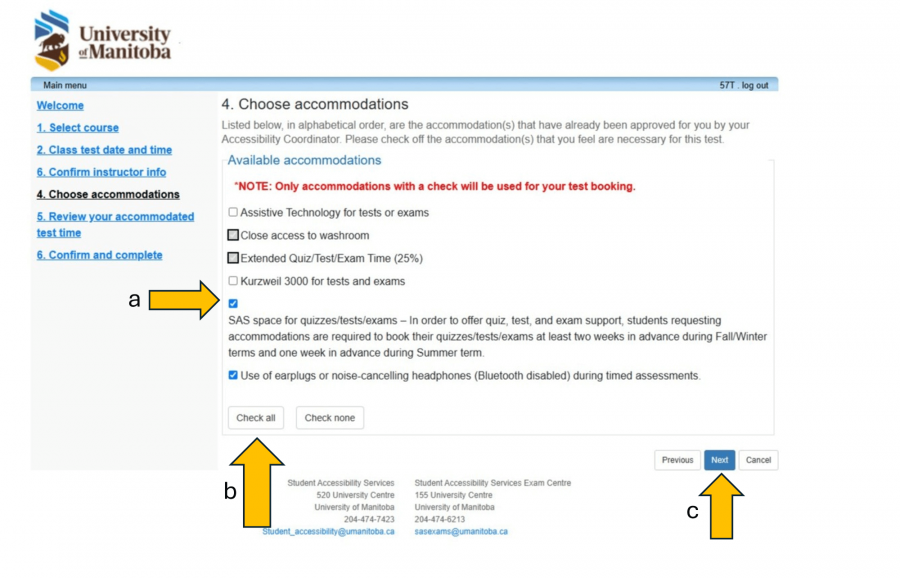
On the Choose Accommodations screen you will see a list of exam accommodations available to you. Some of them will be automatically checked and cannot be changed online.
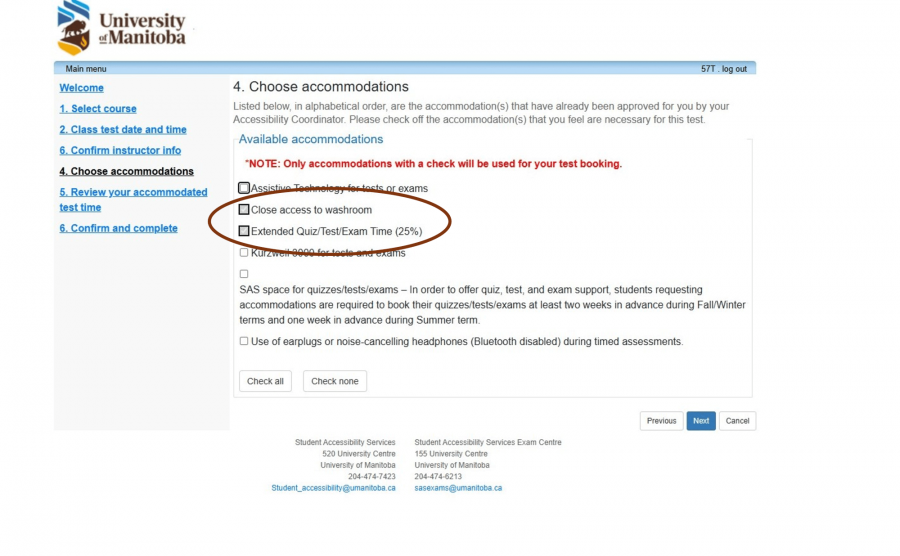
You may, a). check only the accommodations you require for this test, or b) you may select "Check all". For example, I don't need to use Assistive technology for my Math test, but I might for my other History exam. So for this Math test, I did not select "Assistive Tech for tests or exams."
c. Select "Next"
- This page verifies the details of your test/exam extended time (if applicable). Click “Next” to proceed to the last page.
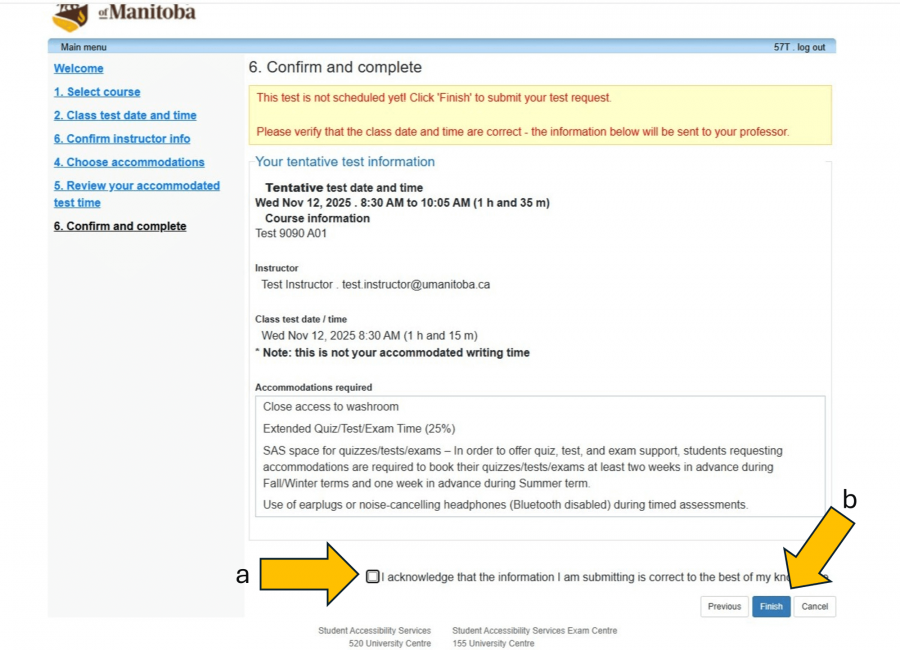
This is the last page, where you will confirm the details you have entered, and complete the booking. You will notice the booking has your accommodated test details at the top of the page in bold, and the class details without accommodations below.
a. Check the box, "I acknowledge that the information I am submitting is correct to the best of my knowledge." If something is not quite right, you may select "Previous" or one of the linked steps on the left-hand side.
b. Select "Finish" once everything is correct.
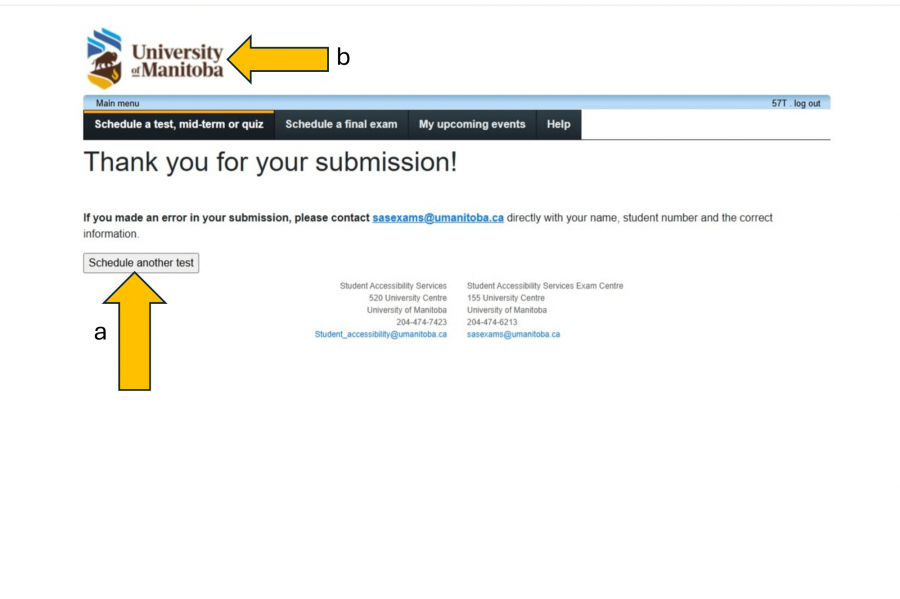
a. On the Thank you screen you may select "Schedule another test"
b. Select the UM Logo to return to the main menu.
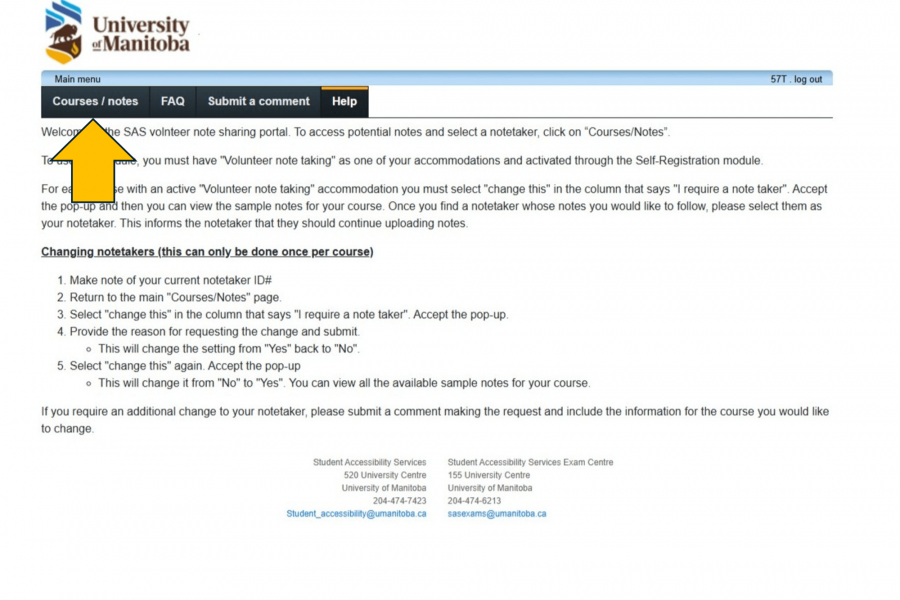
Registered Students Accessing volunteer notes
Notes taken by volunteers are easily accessed in the Student Portal. If there are no notes available for one of your courses, please let your Accessibility Coordinator know as soon as possible.
Written instructions
- Sign into the Student Portal with your UM student email and two-factor authentication.
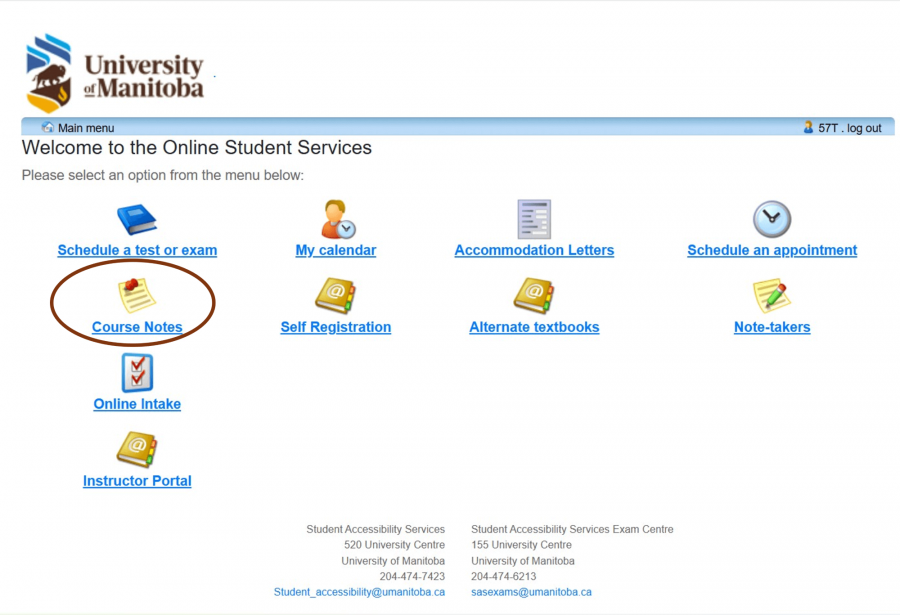
- Select “Course Notes”
- Select “Course/notes” in the left corner
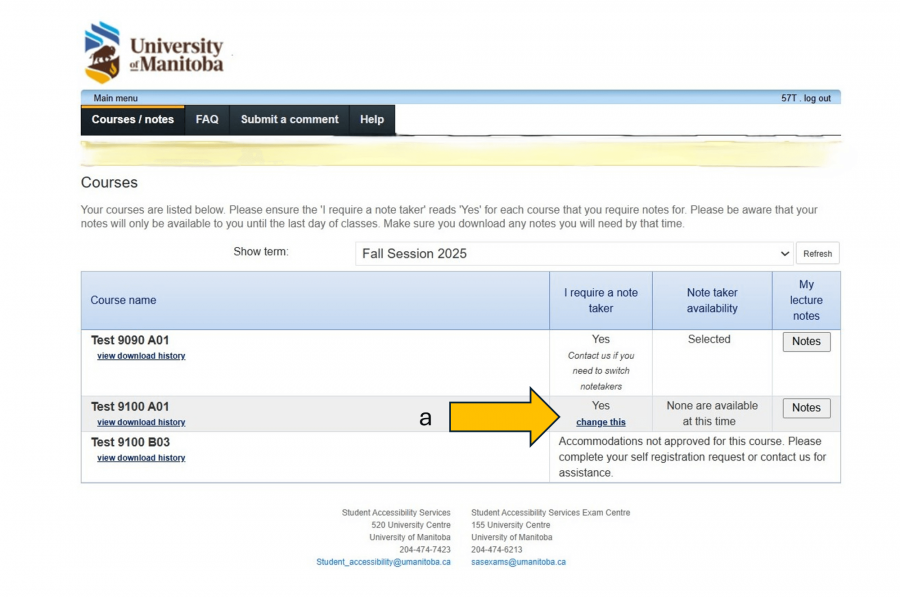
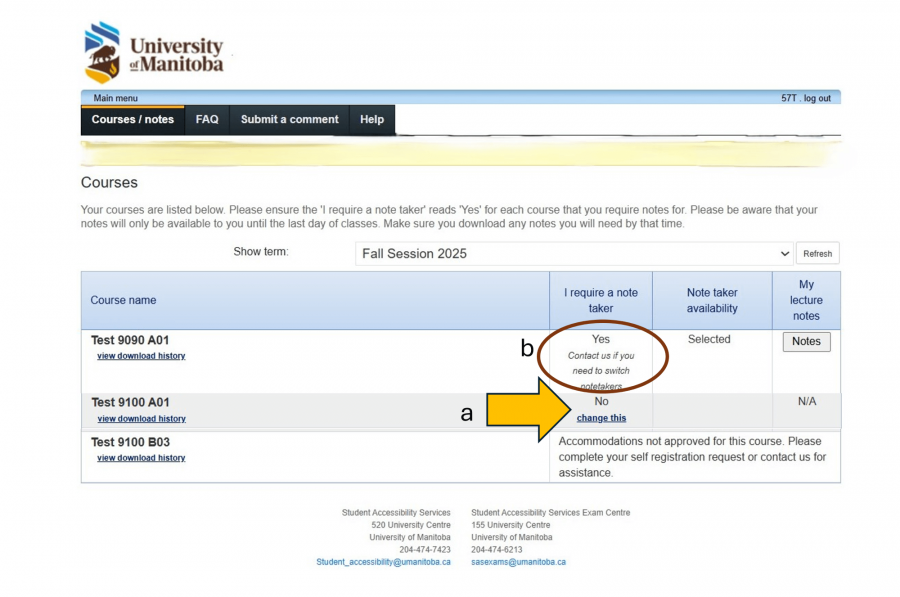
- You must confirm that you require a volunteer notetaker for each course by clicking the “change this” link in the “I require a note-taker” column.
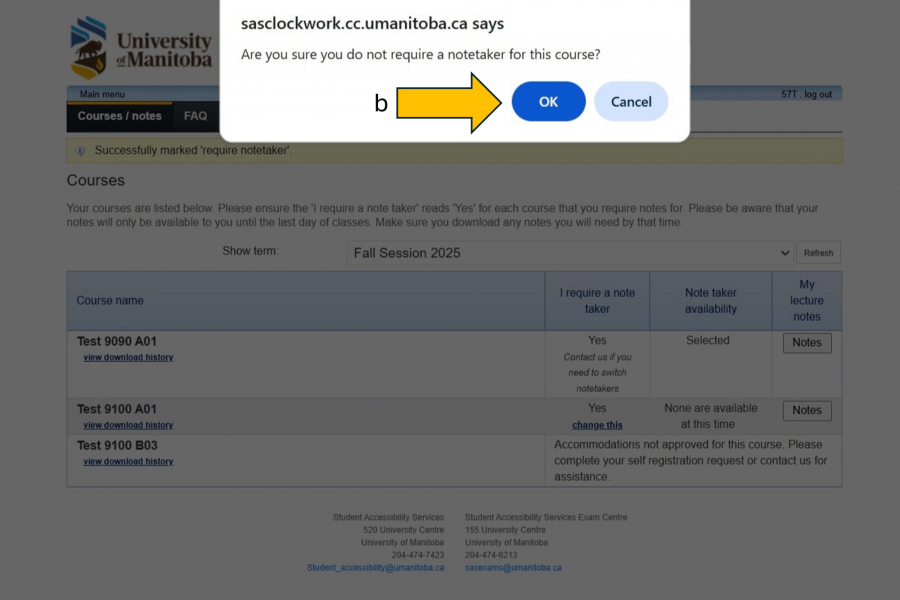
- Click ok to the pop up. This will allow you to view potential notes that are available in your classes.
- You will be able to browse any sample notes that have been submitted by potential note takers in the “Note taker availability” column. Once you select a volunteer, the volunteer will receive an automated email from our office to begin uploading all of their notes for this specific class.
Note: If it says, “none are available at this time”, it means that no one has volunteered their notes and you will need to talk to your Accessibility Coordinator about requesting another announcement to be made in your class. - Once a classmate has uploaded sample notes, and the SAS student has selected this volunteer, you will be able to view the notes on the same page. You will be able to view all lecture notes for this particular class under “My lecture notes.”
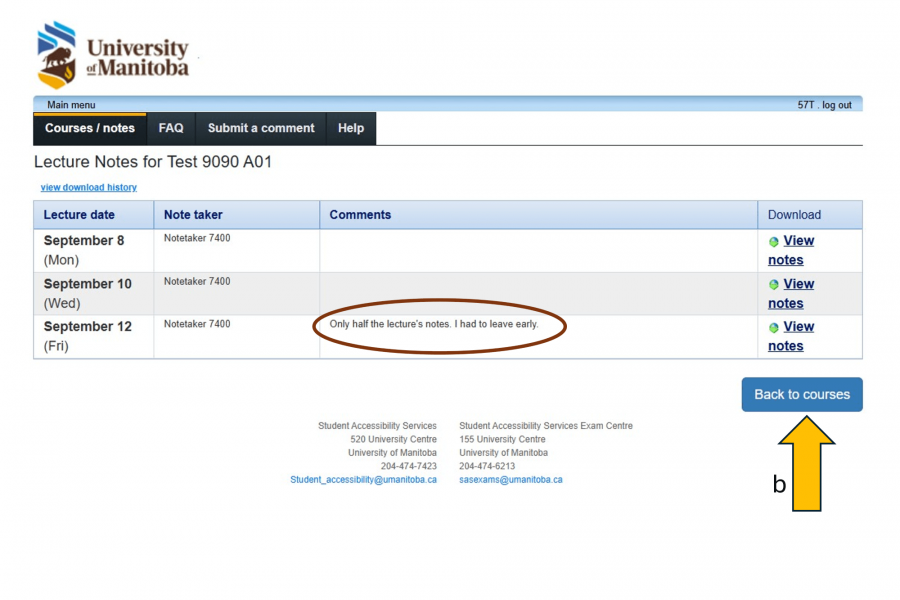
You will see a listing of the notes uploaded and you can select which notes you’d like to download by clicking “View notes”. You may also see any additional comments the volunteer notetaker may have made under the “Comments” column
Screenshot instructions
After you log into the SAS portal with multi-factor authentication:
- Select “Course Notes”
- Select “Courses/notes” in the top left corner
- You must confirm that you require a volunteer notetaker for each course by clicking the “change this” link in the "I require a note taker" column.
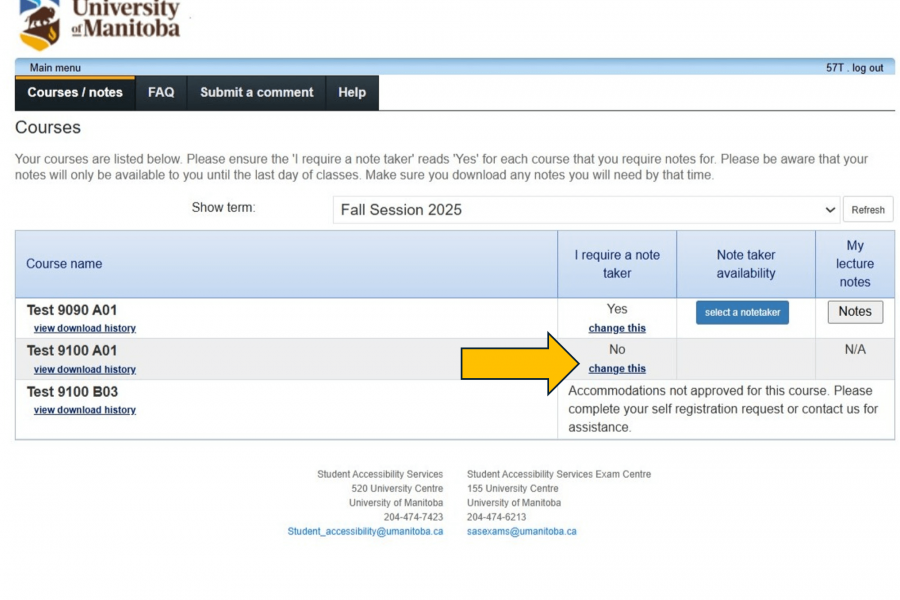
- Click "OK" on the pop up to confirm. This will allow you to view potential notes that are available in your classes
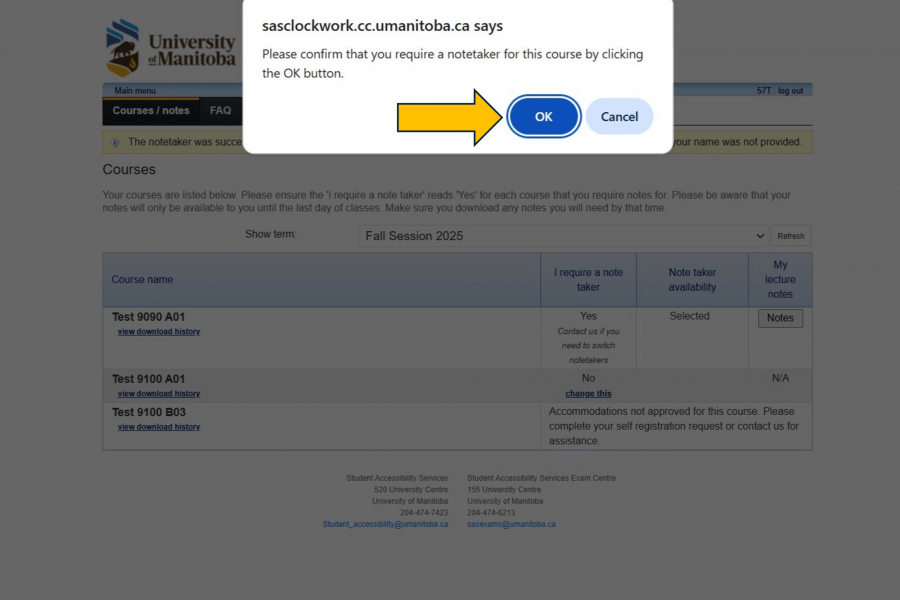
a. Now you can see that the notetaker requirement has changed from No to Yes.
b. Click on "select a notetaker" to view available sample notes.

a. You can view the volunteer notetaker sample notes before making a selection
b. Select "Choose this notetaker" once you find the notes that you will use.
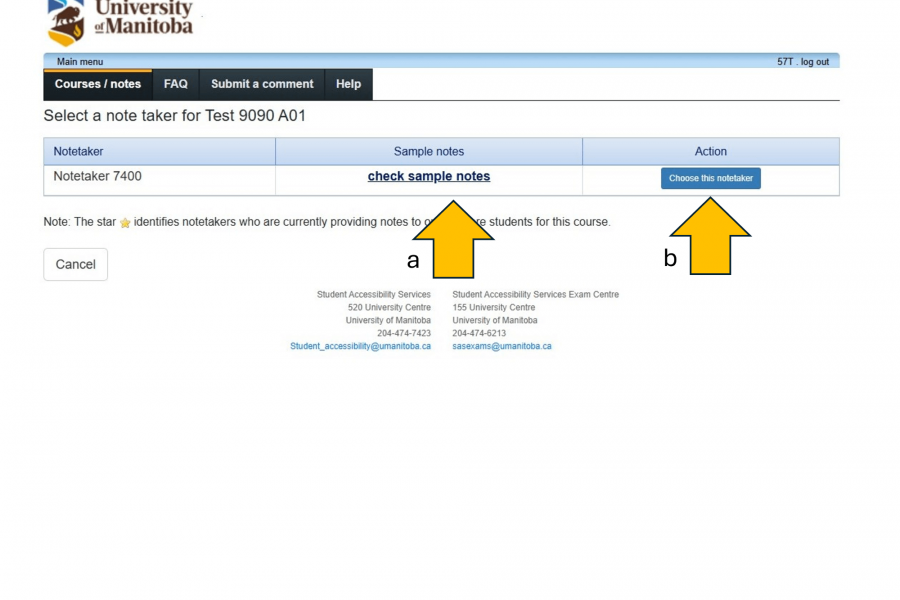
- c. Confirm you choice by selecting "OK" The volunteer will receive an anonymous, automated email from our office that they should continue uploading notes for that specific course.

- a. Once you have a notetaker selected, you can view the notes available for your course by selecting "Notes" in each course row.
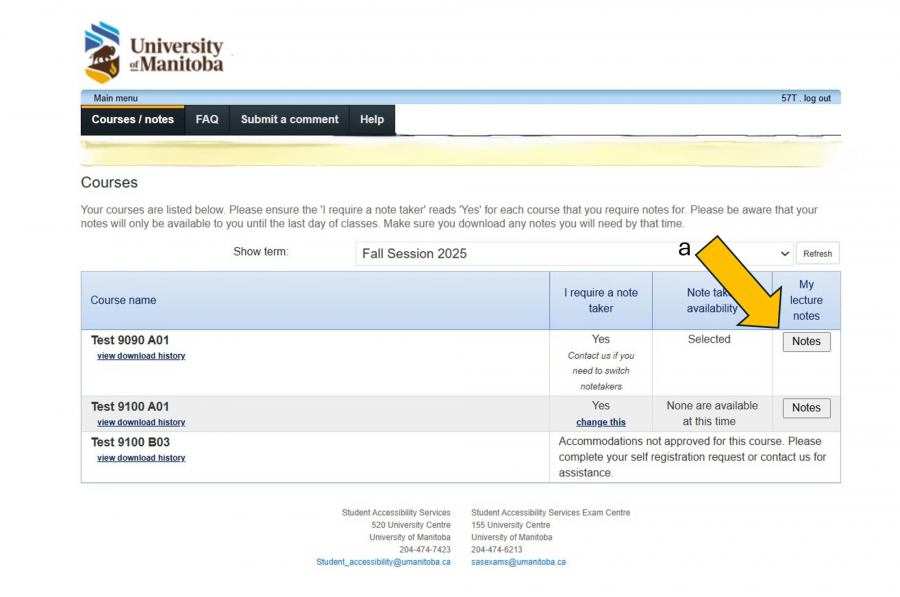
- b. On the Lecture notes screen you can see the lecture date, notetaker, comments and notes available for download. You can return to the courses page by selecting "Back to courses"
Registered students Changing notetakers
Students may request a different notetaker for a variety of reasons. This can be done once per course in the Course Notes section of the portal . If you require another change, please contact our office.
Screenshot instructions
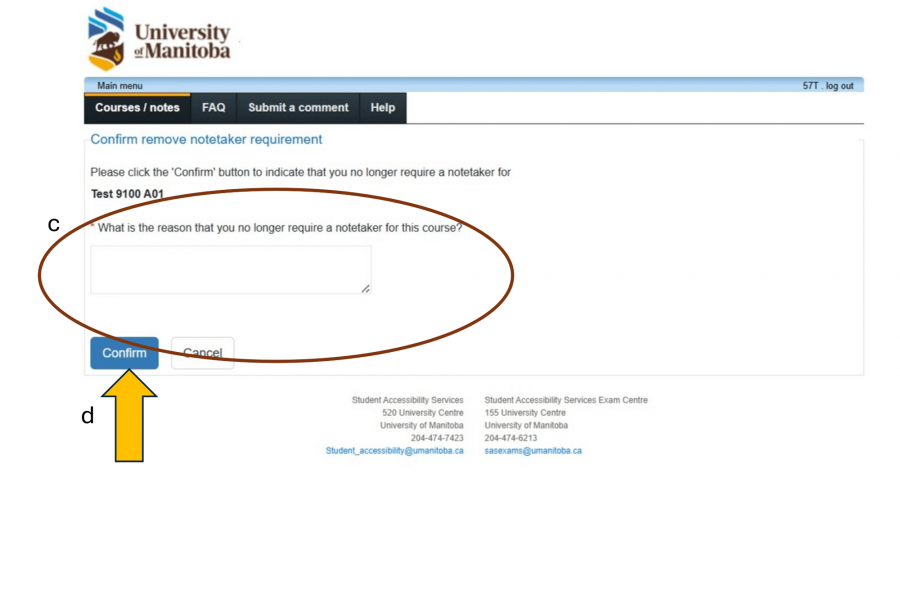
Sometimes a notetaker needs to be changed. Before you begin, make sure you take note of the notetaker number so you do not reselect the same notetaker.
- a. Change your notetaker by selecting the "Change this" link in the "i require a note taker" column for a specific course.
- b. Confirm the change by selecting "OK".
c. You are required to provide a reason for why you are removing the notetaker request.
d. Select "Confirm" to proceed.
a. You can now re-do the notetaker selection steps to chose a new notetaker.
b. If you need to make more than one notetaker change, please "Submit a comment" with your name and course code.
Registered Students Requesting alternate format textbooks
If you have an accommodation for alternate format textbooks, you can make these requests through the student portal. Students are required to provide receipts of their textbook purchases in order to receive alternate format texts.
Written instructions
- Log into the SAS portal with UM student email and two-factor authentication.
- Select “Alternate Textbooks”
- Review the student agreement form
- For a new book request, select “New Request” from the menu bar
- Review through the “Alternate format student confidentiality agreement” and then click in the box indicating you “accept the terms and conditions” and then click “Submit”
- Select the session and course you are looking to obtain books for. You may also do one of the following:
- Click on “Searching for books” and enter in the ISBN of the book you are looking to order
- Click on “Request new content” if the book isn’t already listed
- If you would like to see your current request, click on the “My Requests” tab and then select the session you are wanting to look up
- To download your files, click on “My Files” and select the session you are wanting. Your books will be listed here by title
- Click on the arrow to download onto your computer.
Screenshot instructions
After you log into the SAS Portal with multi-factor authentication:
- Select “Alternate Textbooks”

- The Alternate Formats Media Requests home screen lists the menu options a) New request, b) My requests, c) My files. There is information on this page about expectations and obligations of the student requesting the alternate format media.

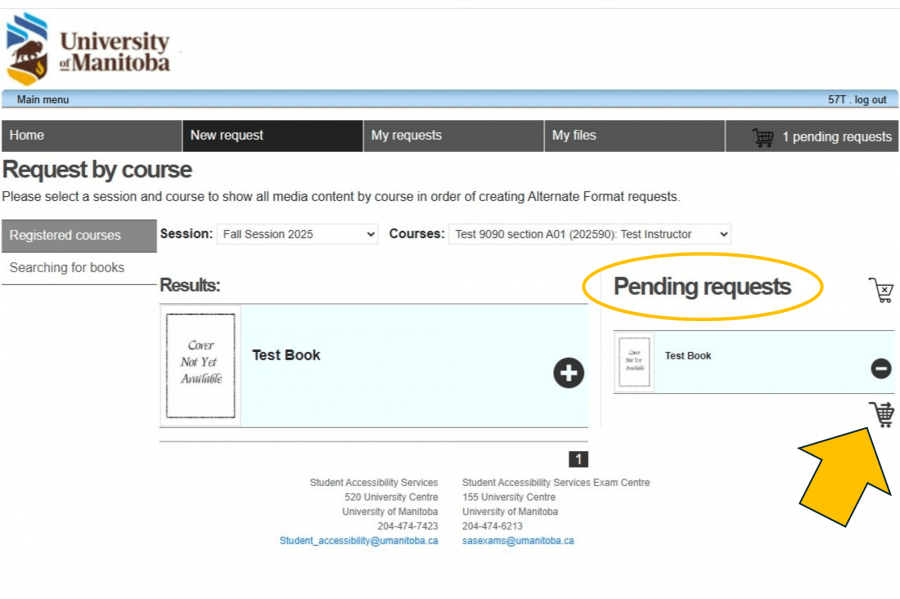
On the "New Request" tab (second on the menu tabs) you can select texts based on your "Registered courses".
a. Select your Session.
b. Select your course.
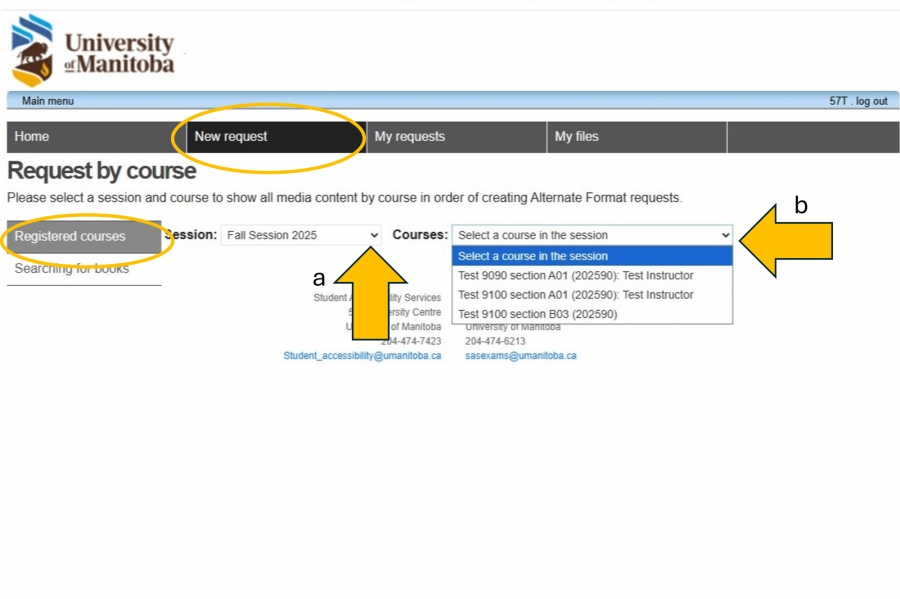
- Textbooks associated with the course will appear below the drop downs. Select the large plus symbol to add the textbook to your cart.
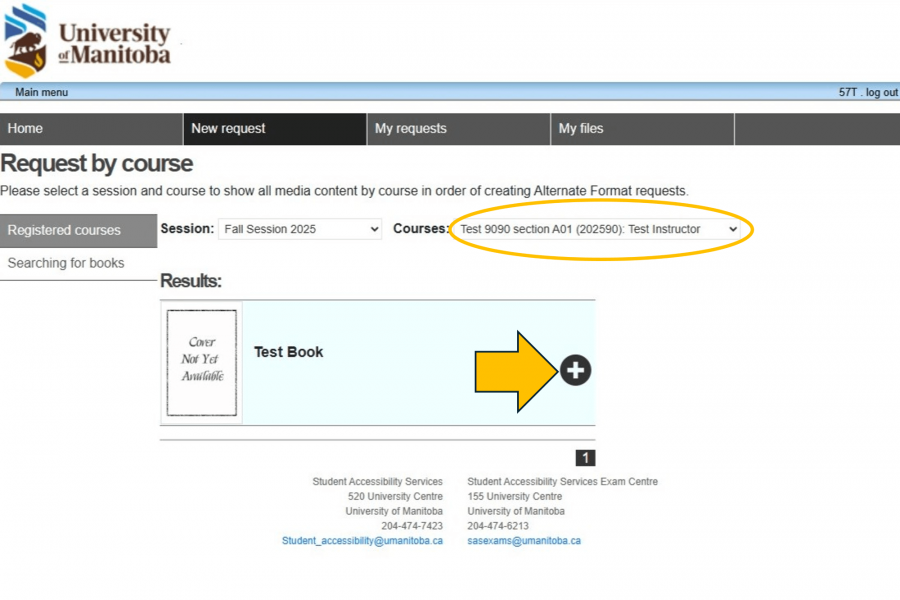
- The book will now appear in a Pending requests cart. You can search for more books or proceed to confirming the request.
- You can also "Request by searching" using the search function for book titles or ISBNs,

- Type a keyword or ISBN into the search bar. The title should appear in a listing of books with similar titles. Select the book you require by clicking on the large plus icon.
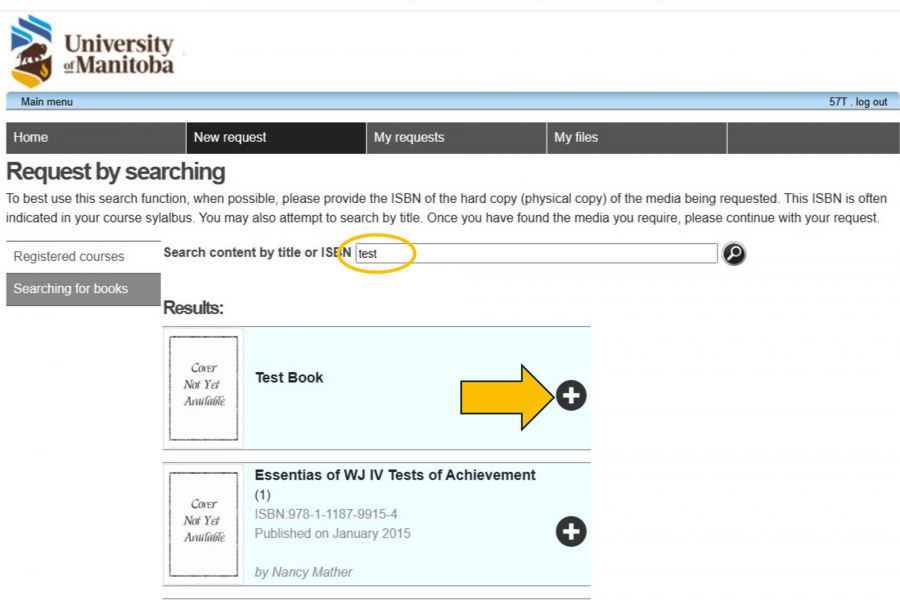
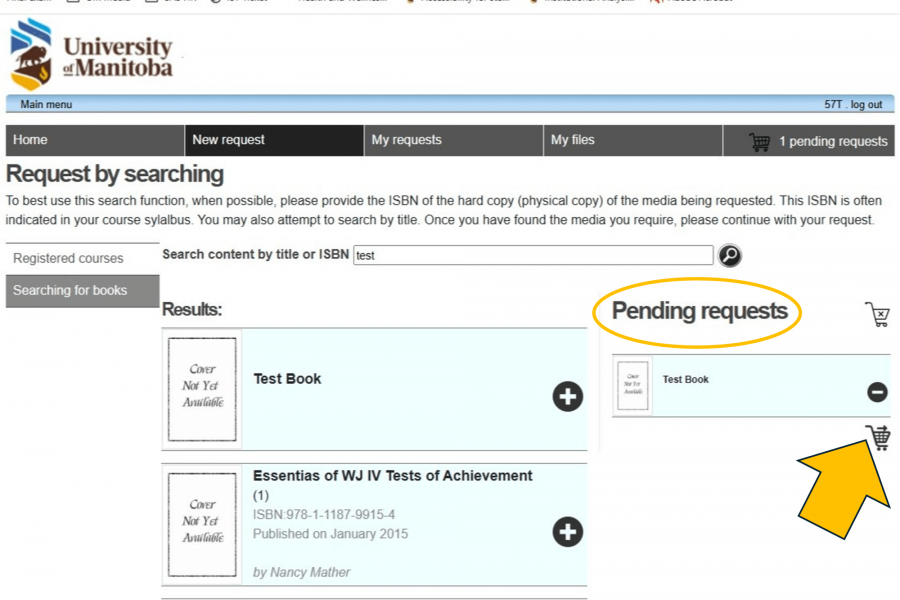
- The title will appear in the "Pending requests" cart. You can continue searching or click the cart icon to proceed to request confirmation.
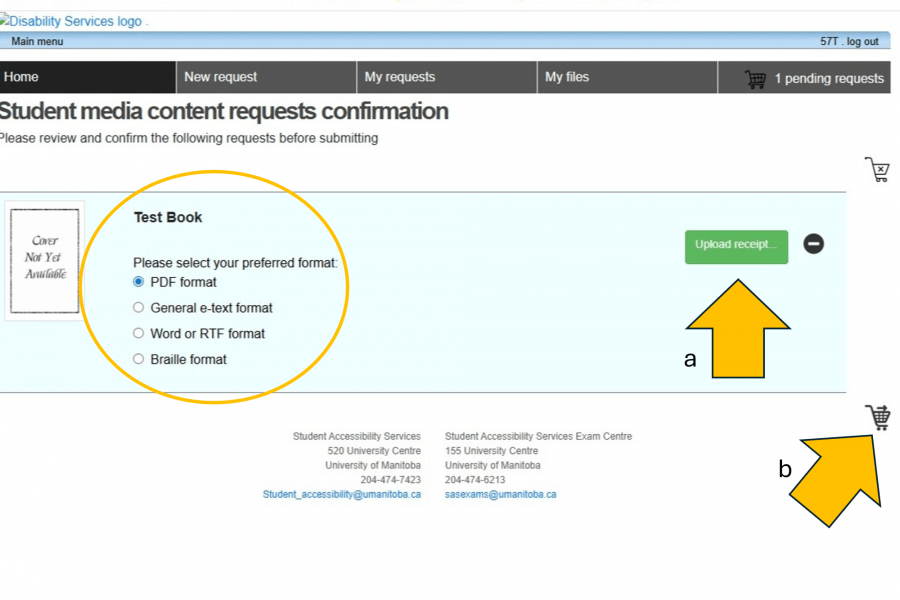
Review the book information and indicate the alternate format being requests from the available options.
a. Please upload a copy of the receipt of the book you purchased prior to making an alternate format media request. This is a requirement for accessing alternate format materials.
b. Select the cart symbol to submit the request.
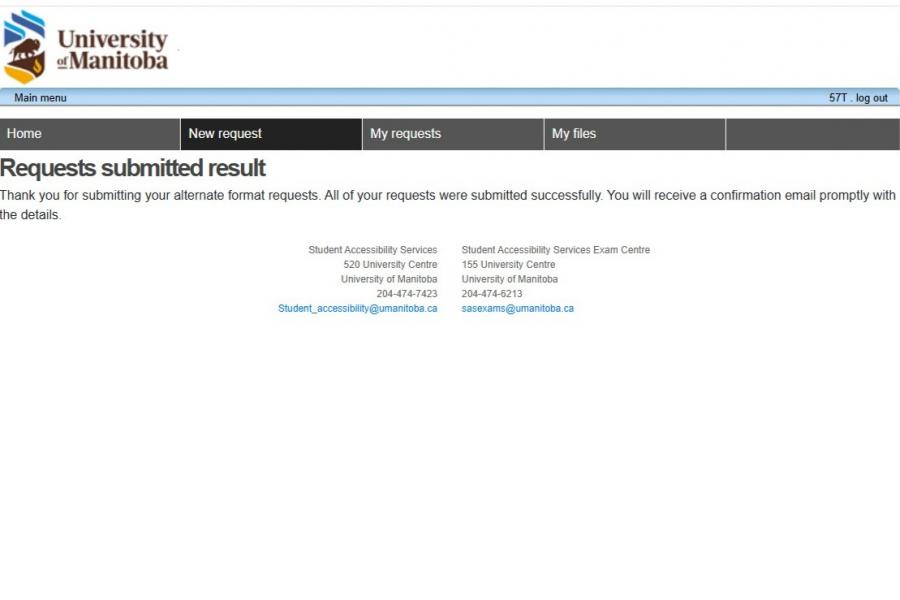
- A Request submitted results screen confirms the submission was made.
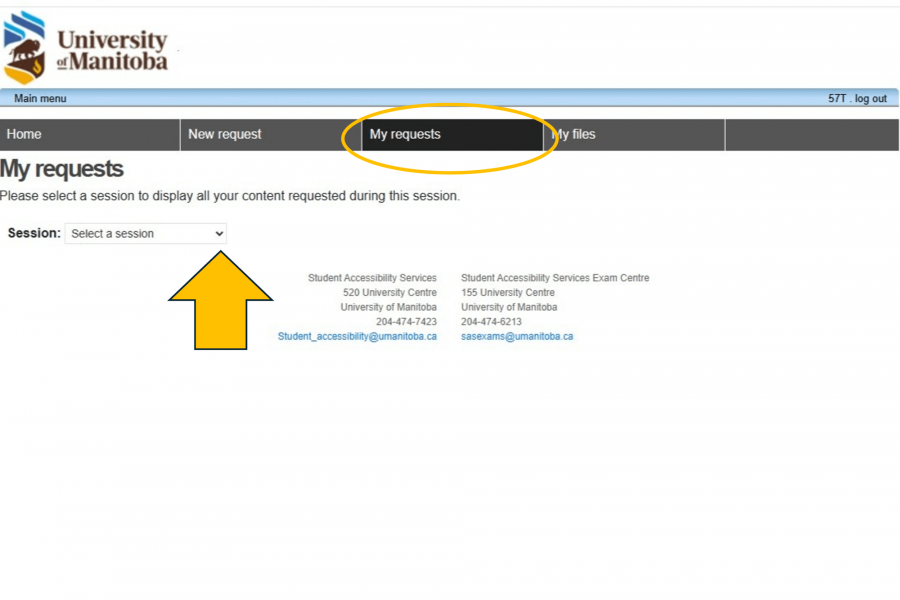
You can view your requests in the SAS Portal while they are being processed by the SAS team.
- Select the "My requests" tab (third of the menu tabs) and select the session.
A list of requested texts will appear. Each one will have the following options:
a. View receipt for the request. If a receipt was not provided at the time the request was made, you will instead have the option to upload it here.
b. To cancel a request, select the minus sign.
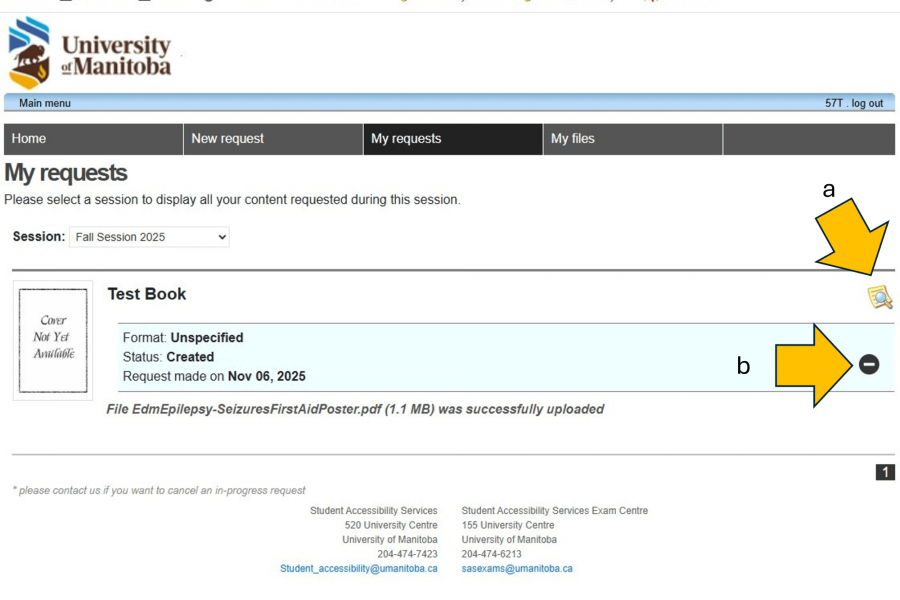
- c. Select "OK" to confirm the cancellation, or "Cancel" to return to the previous screen.

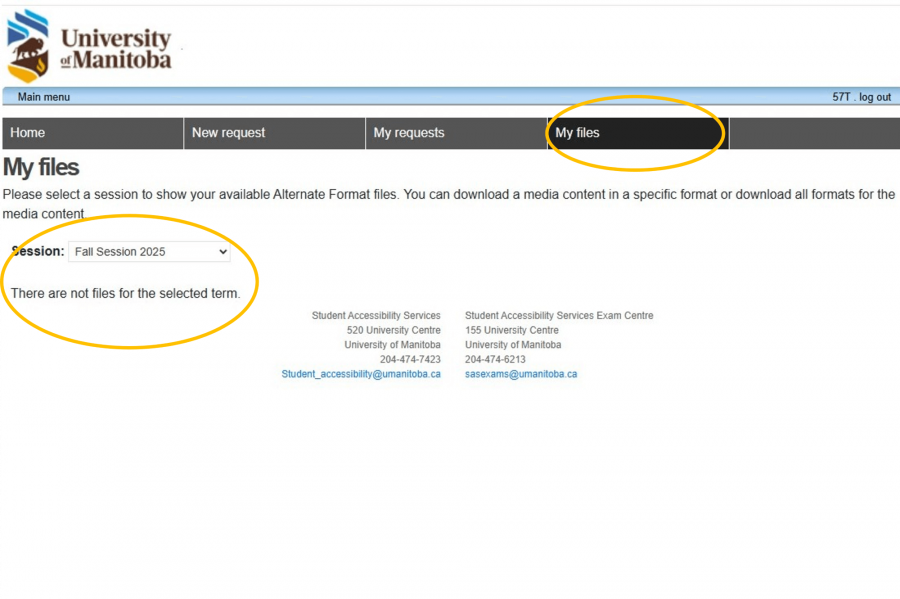
Your alternate format media files will be available for download in the SAS Portal.
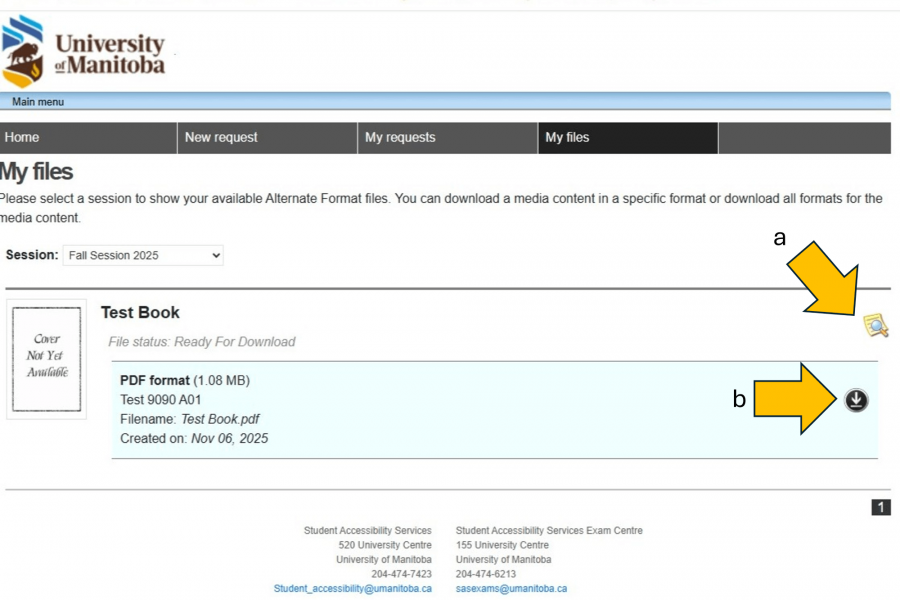
- Select the "My files" tab (fourth of the menu tabs) and select the session. A message will indicate if files are not available.
When files are available they will appear in a list.
a. View receipt for the request.
b. Download a copy of the available alternate format text.
Registered Students Scheduling coordinator appointments
If you need to chat with your Accessibility Coordinator, you can check their availability and schedule virtual or in-person meetings. If your concern is urgent, please contact the SAS office for other options.
Written instructions
- Log into the Student Portal using your UM student email and two-factor authentication.
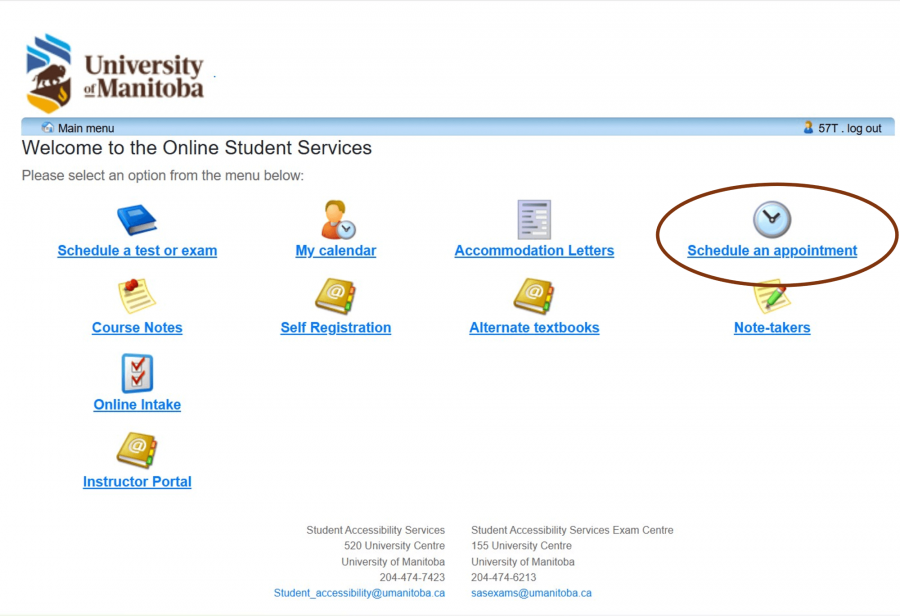
- Select “Schedule an Appointment”
- Click the “Schedule an Appointment" tab on the top left-hand side
- Click the first dropdown menu to choose what type of appointment you would like to book.
- Click the second dropdown menu to choose your Accessibility Coordinator.
- Enter in the date in which you are looking.
- Choose an appointment time by double clicking on the available times on the agenda.
- Review the “Appointment details” and be sure to add in any items you would like to discuss in this meeting. Once you are ready to book, click “Confirm this booking”
Screenshot instructions
After you log into the SAS Portal with multi-factor authentication:
- Select “Schedule an Appointment”
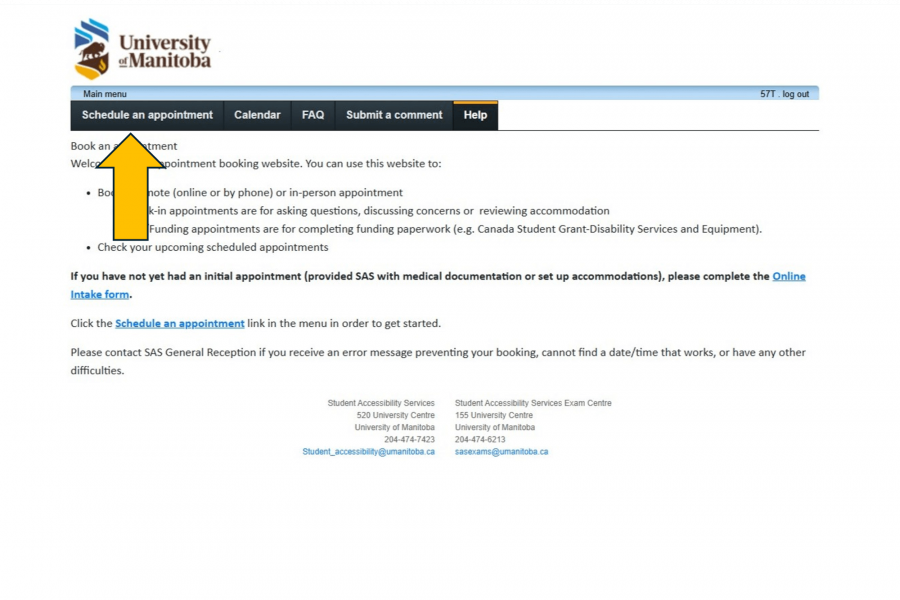
- Read through the information on the landing page and then select :Schedule an appointment" in the top left corner below the UM Logo.
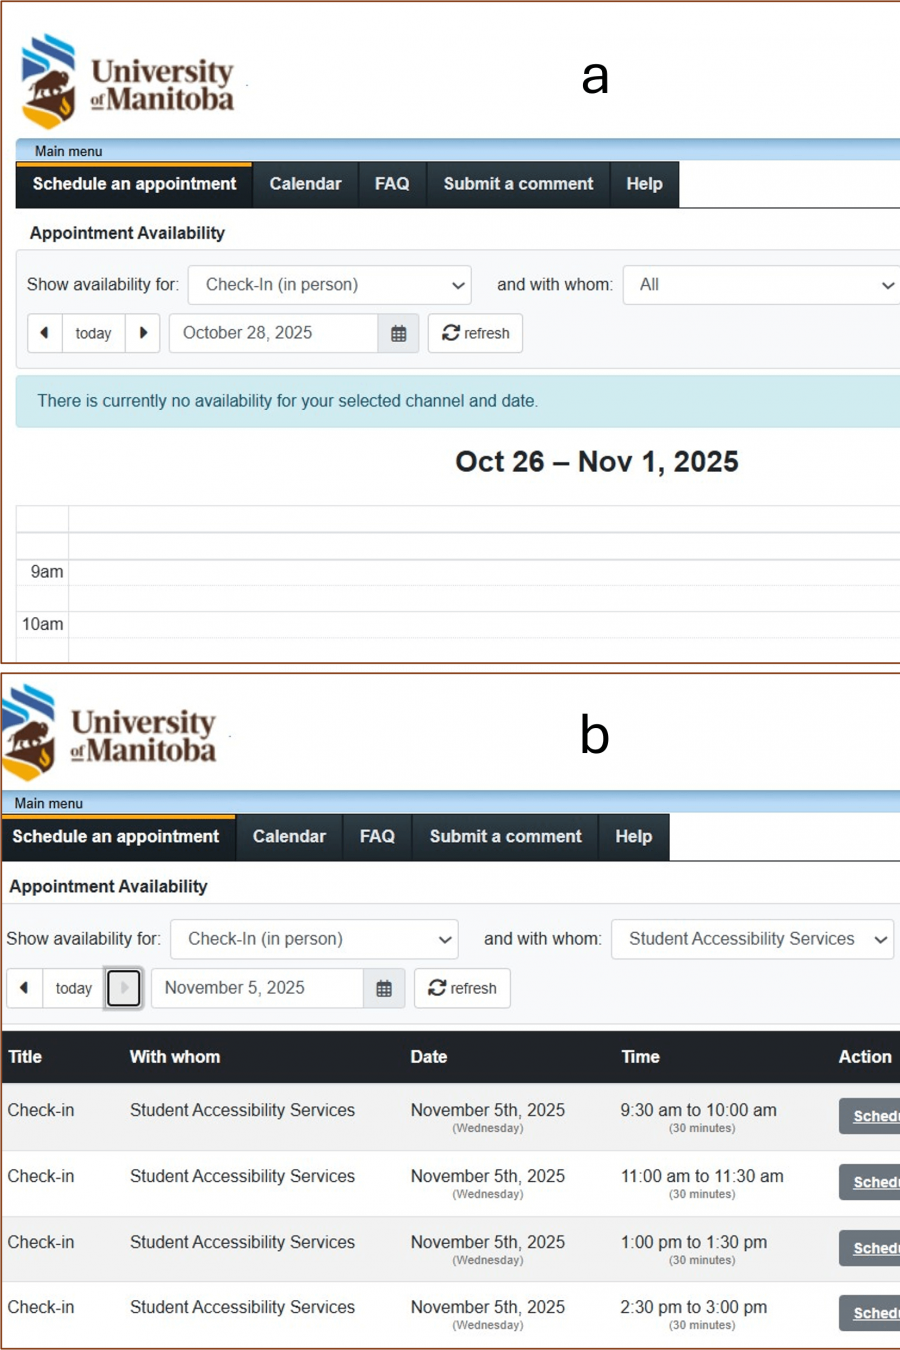
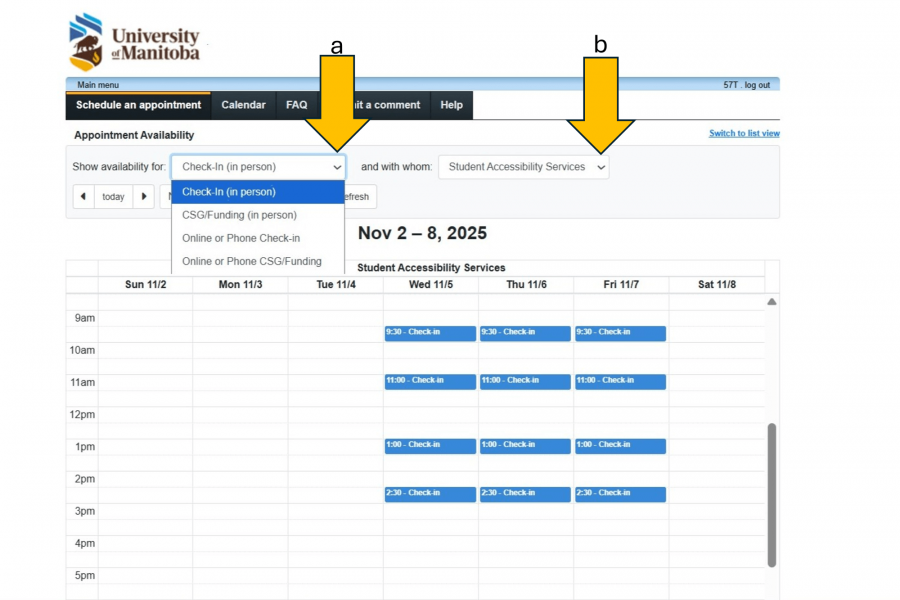
- The schedule defaults to the (a) Calendar View, but can be switched to (b) List View. List view defaults to one day at a time.
a. Use the dropdown menu to choose the type of appointment you would like to book.
b. Use the dropdown menu to select your accessibility coordinator.
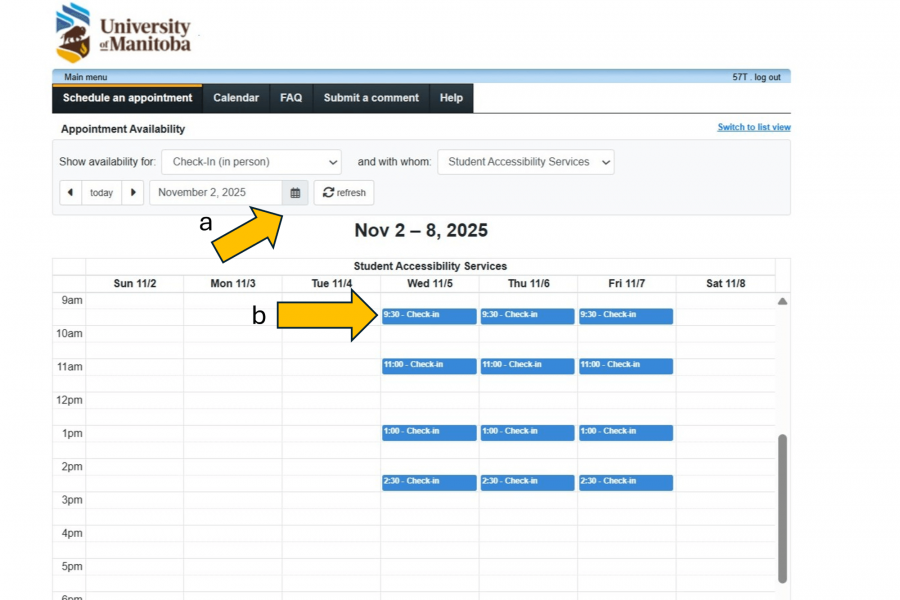
a. Select the appointment date using the date selector or the arrows.
b. Select the timeslot as listed on the Calendar screen.
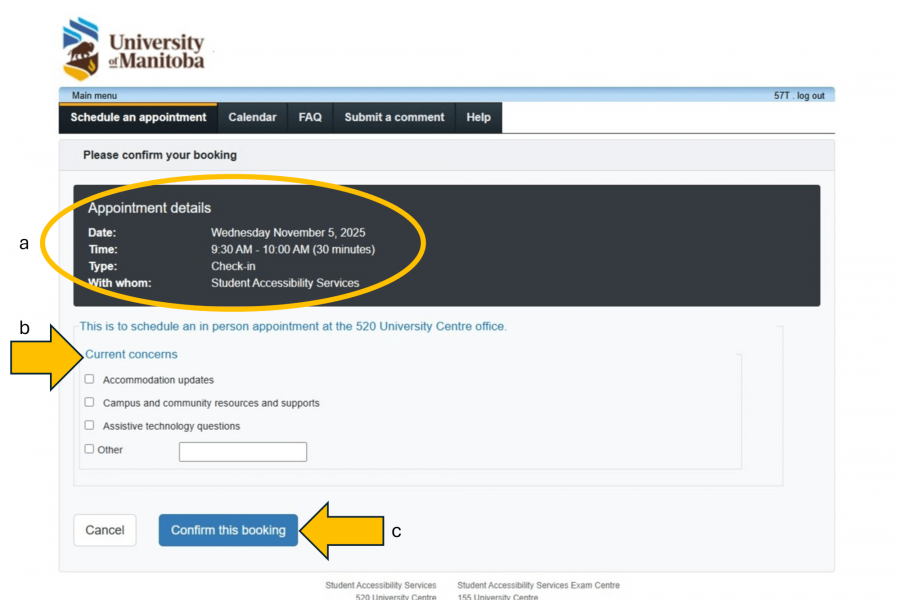
a. Review the “Appointment details”.
b. Complete the "Current concerns" booking form. This information helps your coordinator prepare for the appointment.
c. Select "Confirm this booking".
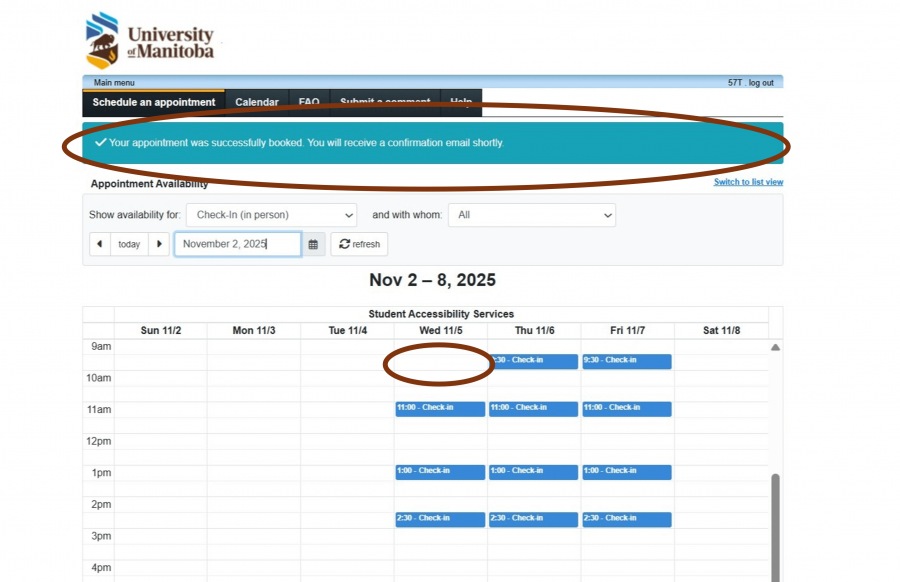
- The confirmation of your appointment will be indicated at the top of the Appointment Availability page and the time you selected will no longer be available in the calendar.
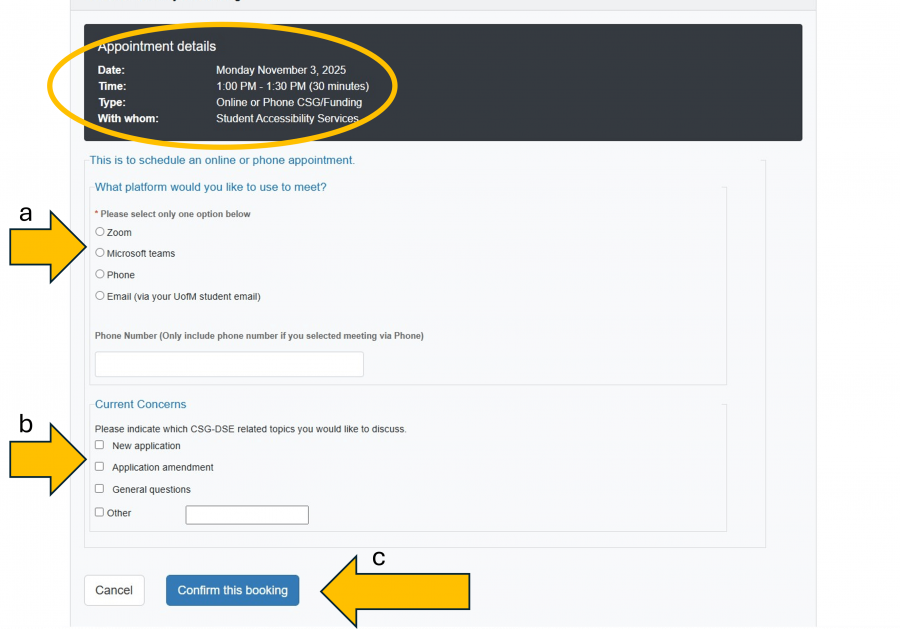
This is an example of an Online CSG/Funding appointment booking form. After reviewing the appointment details:
a. You are required to indicate whether the appointment is on Zoom, Teams or by Phone.
b. You should indicate the "Current concerns" for this specific appointment.
c. Select "Confirm this booking" to complete.
Contact us
Student Accessibility Services
Fort Garry campus
520 UMSU University Centre
66 Chancellors Circle
University of Manitoba (Fort Garry Campus)
Winnipeg, MB R3T 5V6 Canada
SAS Exam Centre
155 UMSU University Centre
66 Chancellors Circle
University of Manitoba (Fort Garry campus)
Winnipeg, MB R3T 5V6 Canada
Bannatyne campus
S211 Medical Services Building
750 Bannatyne Avenue
University of Manitoba (Bannatyne campus)
Winnipeg, MB R3E 0W2 Canada
204-474-7423 (Main office)
204-474-6213 (Exam Centre)
204-272-3190 (Bannatyne campus)
204-474-7567
Fort Garry office: 8:30 a.m. to 4:30 p.m.
Exam Centre: 8:30 a.m. to 9:00 p.m.